Building Your Own ChatGPT with OpenAI API: A Step-by-Step Guide

About This Tutorial
Welcome to this tutorial on building your ChatGPT app with OpenAI. This step-by-step guide will walk you through the process of creating your own personalized/customized ChatGPT application using the OpenAI API. You will learn to utilize the pre-trained models and integrate them into a functioning app.
Whether you're a developer looking to add AI capabilities to your project or just someone interested in exploring the possibilities of AI, this tutorial will guide you through how to start building your ChatGPT app with OpenAI API and Next.js!
What is OpenAI API
OpenAI API is a cloud-based platform that allows developers to build artificial intelligence models and applications. It provides access to the state-of-the-art language processing capabilities of OpenAI, which can be used to develop chatbots, language translation models, and more.
With OpenAI API, developers can quickly and easily build AI models without needing to have extensive knowledge or expertise in the field. The platform is user-friendly and accessible, making it a great choice for both seasoned AI developers and those who are just starting out.
Preview on what we're going to build
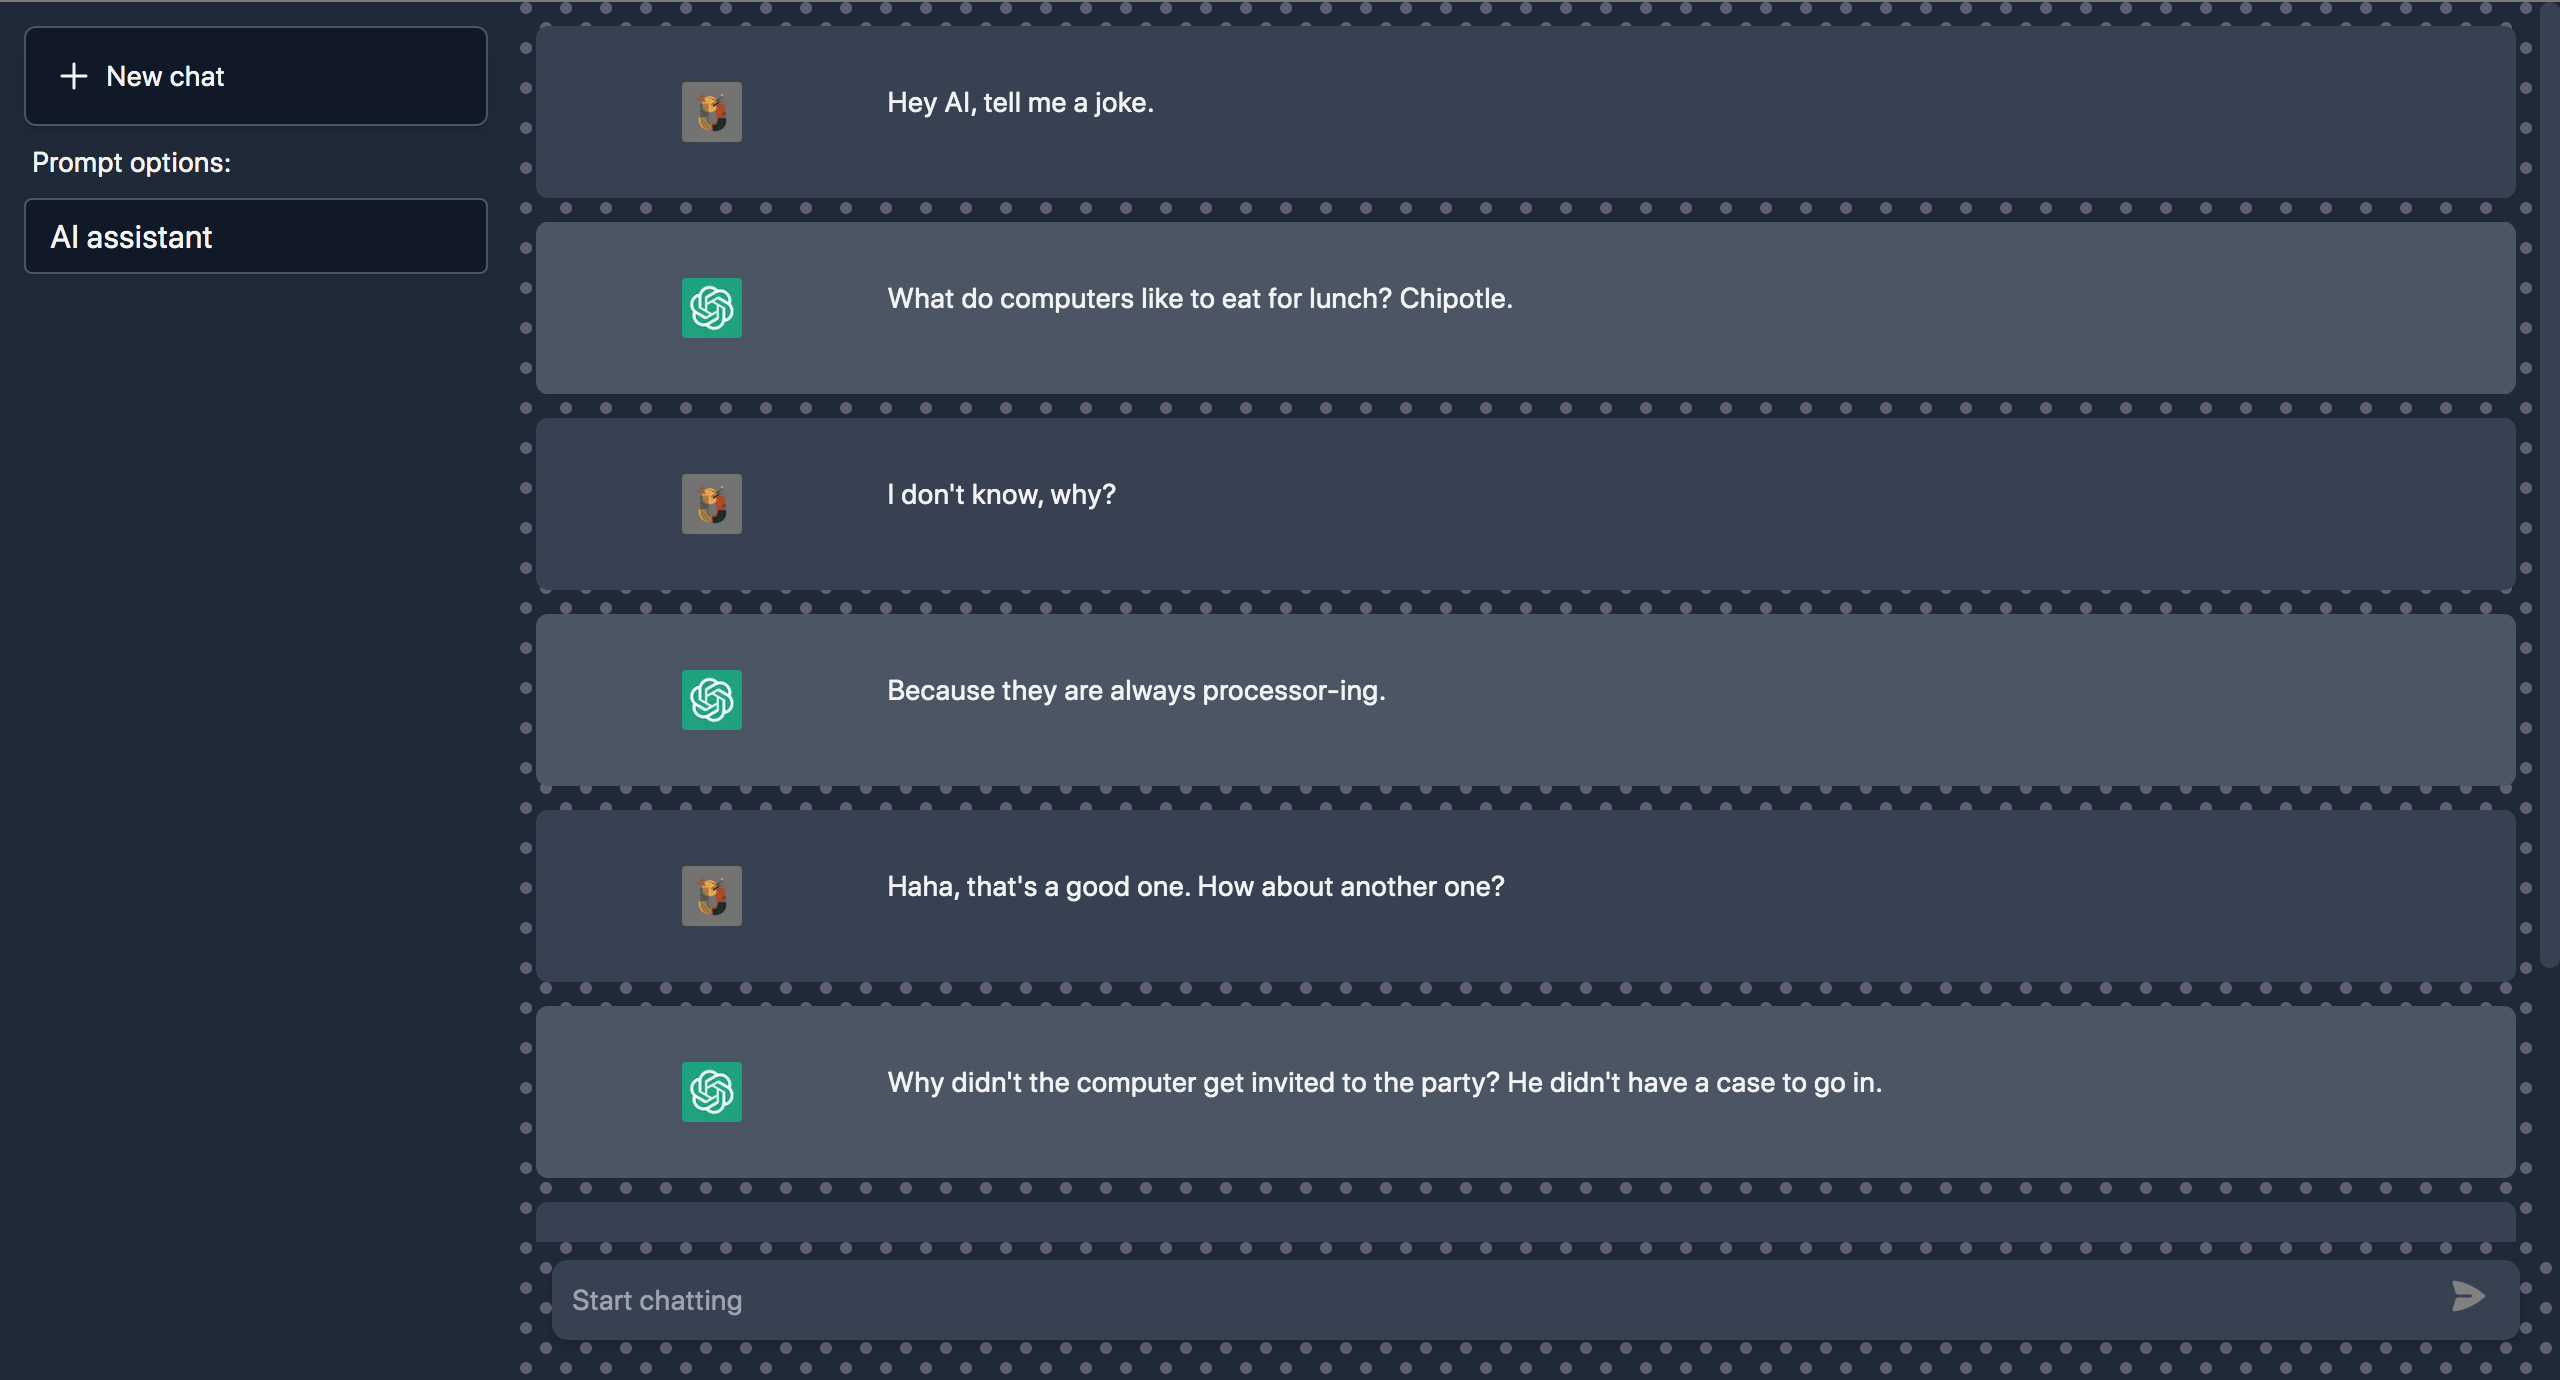
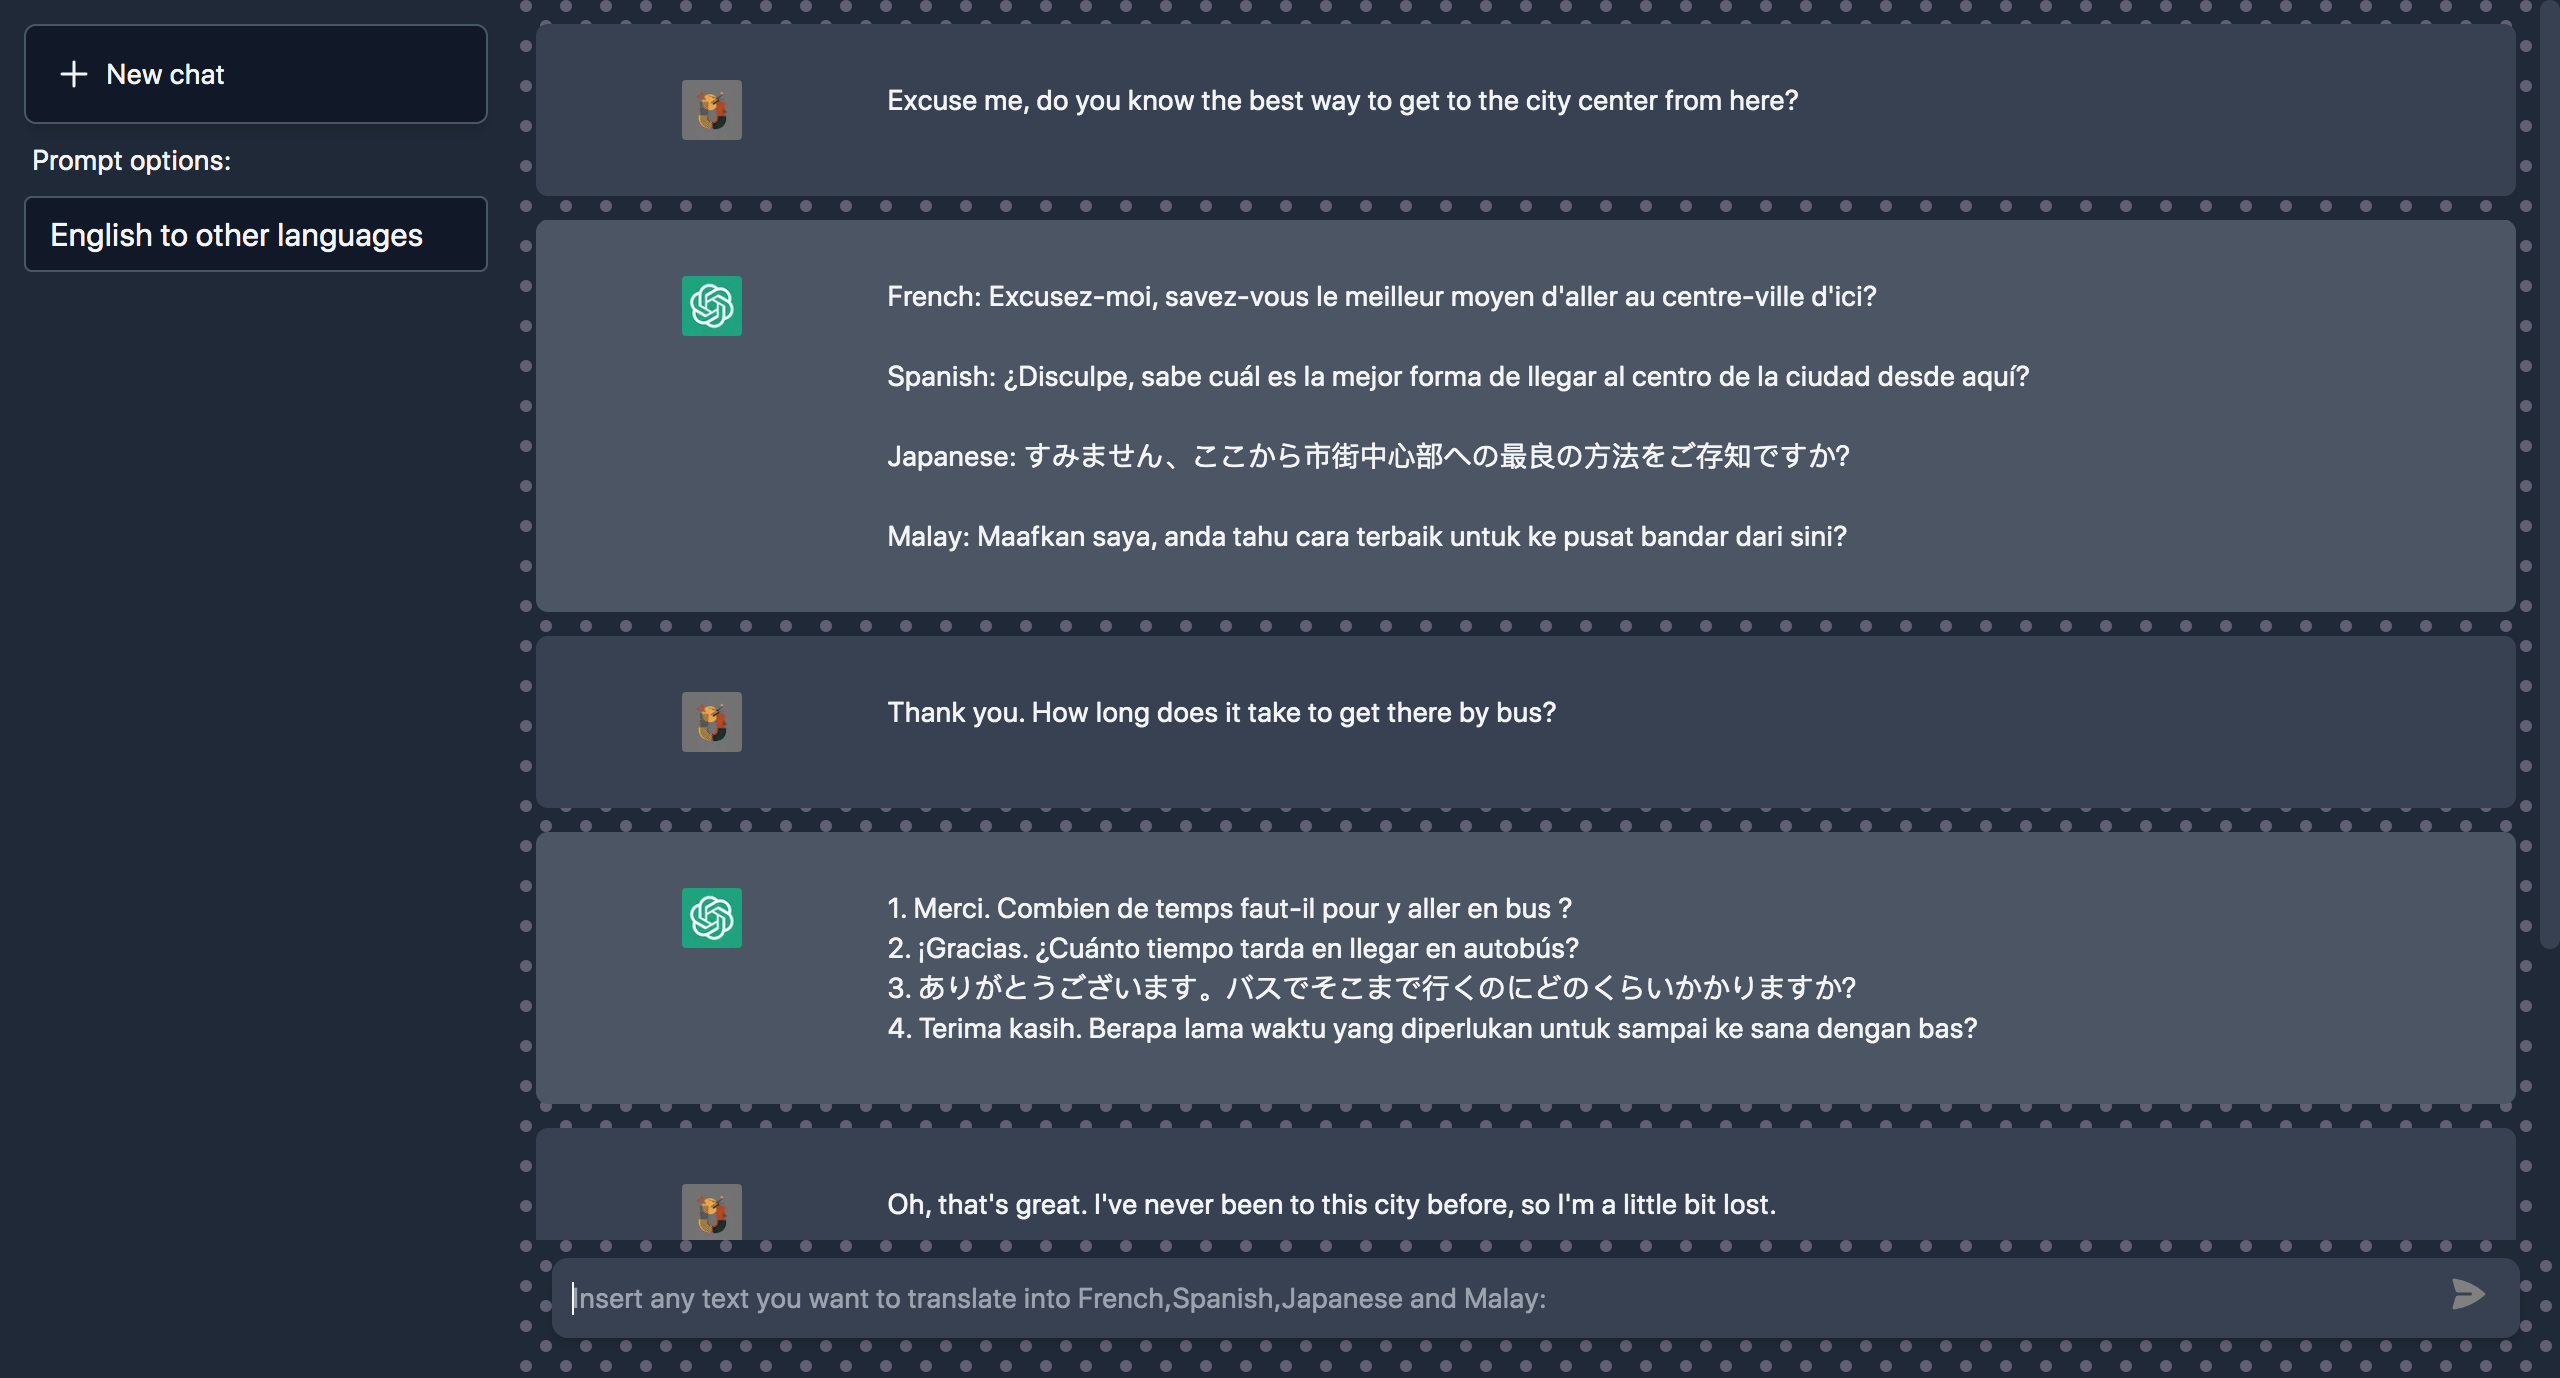
This is just a super simple web app project we can build with Next.js and OpenAI API where you can interact and have a conversation with OpenAI pre-trained models. For this tutorial, we're going to create 3 prompt templates each one has its way of how we want the AI to behave (AI assistant, English to other languages, and image generator). Since these are pre-trained models, we have to give them proper instructions on what we expect them to do.

Template Starter Kit

Before we begin, I found awesome starter kit templates to build your app with OpenAI API by Adrian Twarog on Youtube, where you can get some apps idea on what you want to build with OpenAI API and get started quickly and easily, without having to spend hours building the basic functionality from scratch.
- ChatGPT Template Starter Kit / GPT3
- ChatGPT Discord Bot Starter Kit
- OpenAI Template Starter Kit for ChatGPT / GPT3
They are designed to save you time and effort when building your ChatGPT app with React.js and OpenAI.
Fully customizable and configurable so that you can tailor it to your specific needs. Whether you want to change the design, add new features, or tweak the functionality, this template allows you to do it all.
You'll have access to a pre-built UI, a sample codebase, and instructions to guide you through the process. It also includes all the necessary features which will save you time and make your app more robust.
Perfect for developers, researchers, or anyone looking to build a ChatGPT app without having to start from scratch. It is a great tool to quickly prototype your idea and improve it as you go. With this template, you'll be able to focus on the fun part - experimenting with the OpenAI API and building a unique and powerful AI assistant.
Set up a new Next.js project
Let's get started, First, let’s make sure that your development environment is ready.
- If you don’t have Node.js installed, install it from here. You’ll need Node.js version 10.13 or later.
- You’ll be using your text editor and terminal app for this tutorial or you can use Visual Studio Code which is recommended.
- If you use Visual Studio Code hit cmd/ctrl + J to open the terminal
Create a Next.js app
To create a Next.js app, open your terminal, cd into the directory you’d like to create the app in, and run the following command:
npx create-next-app@latest chatgptthis is my next.js setup for this project:
- TypeScript: No
- ESLint: Yes
src/directory: No- experimental
app/directory: No - import alias: @/*
cd chatgptThen, run the following command:
npm run devThis starts your Next.js app’s "development server" (more on this later) on port 3000.
Let’s check to see if it’s working. Open http://localhost:3000 from your browser.
Install Tailwindcss
To quickly style our app we're going to use Tailwindcss which is a CSS framework. Tailwindcss is a CSS framework that emphasizes flexibility and utility. It provides you with modular, customizable classes that can be used to quickly build responsive layouts for the web.
let's Install Tailwindcss and its peer dependencies via npm, and then run the init command to generate both tailwind.config.js and postcss.config.js.
open a new terminal tab and type these commands in your terminal:
npm install -D tailwindcss postcss autoprefixer
npx tailwindcss init -p
Add the paths to all of your template files in your tailwind.config.js file.
/** @type {import('tailwindcss').Config} */
module.exports = {
  content: [
    "./pages/**/*.{js,ts,jsx,tsx}",
    "./components/**/*.{js,ts,jsx,tsx}",
  ],
  theme: {
    extend: {

    },
  },
  plugins: [],
}Add the @tailwind directives for each Tailwind’s layers to your styles/globals.css file. Replace everything with this code:
@tailwind base;
@tailwind components;
@tailwind utilities;Then go to pages/index.js . Replace everything with this code:
export default function Home() {
  return (
    <h1 className="text-3xl font-bold underline">
      Hello world!
    </h1>
  )
}Once everything is done. Restart the server by typing cmd/ctrl + C in the terminal to stop it and then npm run dev to run the server again and you should see this page on http://localhost:3000

Let’s build this page next!
Build the frontend
Let’s edit pages/index.js.
- Make sure the Next.js development server is still running.
- Open
pages/index.jswith your text editor.
Adding Head to index.js
Open the pages/index.js file and add an import for Head from next/head at the beginning of the file:
import Head from 'next/head';Then, update the exported Home component to include the Head component:
export default function Home() {
  return (
    <>
      {/* Head */}
      <Head>
          <title>ChatGPT</title>
          <link rel="icon" href="/openai.png"/>
      </Head>
    </>
  )
}You can use this image for the title icon. Put it in the public folder
The browser tab should now say “ChatGPT”.
Building the UI
Now, update the pages/index.js to separate the sidebar and the main part of the page.
import Head from "next/head";

export default function Home() {
  return (
    <>
      {/* Head */}
      <Head>
          <title>ChatGPT</title>
          <link rel="icon" href="/openai.png"/>
      </Head>
      {/* Main */}
      <div className={"w-full min-h-full"}>
        <div className="flex">
          {/* Sidebar */}
          <div className="bg-gray-800 h-screen w-1/5 p-2">
          </div>
          {/* Main area */}
          <div className="w-4/5 relative">
          </div>
        </div>
      </div>

    </>
  )
}You should now see they have been separated

Adding custom background
Create a new file style/bg.module.css and put this custom background CSS code.
.customBg{
    background-color: #1f2937;
    background-image: url("data:image/svg+xml,%3Csvg width='20' height='20' viewBox='0 0 20 20' xmlns='http://www.w3.org/2000/svg'%3E%3Cg fill='%239C92AC' fill-opacity='0.52' fill-rule='evenodd'%3E%3Ccircle cx='3' cy='3' r='3'/%3E%3Ccircle cx='13' cy='13' r='3'/%3E%3C/g%3E%3C/svg%3E");
}
You can make your background in Hero Patterns and paste the code in bg.module.css.
Update the main div from this:
<div className={"w-full min-h-full"}>to this:
<div className={`w-full min-h-full ${custombg.customBg}`}>Don't forget to import it into pages/index.js as custombg . Finally, your index.js should look like this:
import Head from "next/head";
import custombg from "/styles/bg.module.css";

export default function Home() {
  return (
    <>
      {/* Head */}
      <Head>
          <title>ChatGPT</title>
          <link rel="icon" href="/openai.png"/>
      </Head>
      {/* Main */}
      <div className={`w-full min-h-full ${custombg.customBg}`}>
        <div className="flex">
          {/* Sidebar */}
          <div className="bg-gray-800 h-screen w-1/5 p-2">
          </div>
          {/* Main area */}
          <div className="w-4/5 relative">
          </div>
        </div>
      </div>

    </>
  )
}Here is the result:

Building the sidebar
First, let's build the new chat button and prompt options select button. These are the only two buttons we need in the sidebar.
Adding a new chat and prompt select button
Now, copy the following code and replace everything in the index.js file:
import Head from "next/head";
import custombg from "/styles/bg.module.css";

export default function Home() {
  return (
    <>
      {/* Head */}
      <Head>
          <title>ChatGPT</title>
          <link rel="icon" href="/openai.png"/>
      </Head>
      {/* Main */}
      <div className={`w-full min-h-full ${custombg.customBg}`}>
        <div className="flex">
          {/* Sidebar */}
          <div className="bg-gray-800 h-screen w-1/5 p-2">
            <div>
              {/* New chat */}
              <div>
                <div className="text-gray-100 flex items-center text-xl p-3  bg-gray-900 rounded-md border border-slate-600 shadow-md m-1 hover:bg-gray-700" onClick="">
                    <svg xmlns="http://www.w3.org/2000/svg" fill="none" viewBox="0 0 24 24" strokeWidth={1.5} stroke="currentColor" className="w-6 h-6">
                      <path strokeLinecap="round" strokeLinejoin="round" d="M12 6v12m6-6H6" />
                    </svg>
                    <h2 className="text-sm px-1">
                        New chat
                    </h2>
                </div>
              </div>
              {/* Prompts */}
              <div>
                  <h2 className="text-sm px-2 py-1 text-gray-100">
                        Prompt options:
                  </h2>
                  <div className="p-1 flex justify-center">
                    <select onChange="" className="form-select appearance-none
                    block
                    w-full
                    px-3
                    py-1.5
                    text-gray-100
                    bg-gray-900 bg-clip-padding bg-no-repeat
                    border border-slate-600
                    rounded
                    transition
                    ease-in-out
                    m-0
                    focus:text-gray-100 focus:bg-gray-900 focus:border-slate-600 focus:outline-none">
                    {/* Prompts select button  */}
                    </select>
                  </div>
              </div>
            </div>
          </div>
          {/* Main area */}
          <div className="w-4/5 relative">
          </div>
        </div>
      </div>

    </>
  )
}You should now see the new buttons have been added if you access http://localhost:3000.

Building the chat area
In the main area, we wanted to have two sides, the chat area, and the text input area. Let's add the input area first. Add the following code above under the Main area div :
{/* Text input area */}
<div>
    <div className="p-5 absolute bottom-0 right-0 left-0">
        <div className="flex justify-center mb-2">
        {/* ClocLoader */}
        </div>
        <form className="relative" onSubmit="">
        <input
        type="text"
        placeholder= "Start chatting"
        value=""
        required
        onChange=""
        rows="1"
        className="block p-2.5 w-full text-sm text-gray-50 bg-gray-700 rounded-lg focus:outline-none ring-gray-500 focus:border-gray-500 shadow-md"
        />
        <button type="submit" className="right-2 bottom-3 absolute pr-2" >
            <svg xmlns="http://www.w3.org/2000/svg" viewBox="0 0 20 20" fill="gray" className="w-5 h-5">
            	<path d="M3.105 2.289a.75.75 0 00-.826.95l1.414 4.925A1.5 1.5 0 005.135 9.25h6.115a.75.75 0 010 1.5H5.135a1.5 1.5 0 00-1.442 1.086l-1.414 4.926a.75.75 0 00.826.95 28.896 28.896 0 0015.293-7.154.75.75 0 000-1.115A28.897 28.897 0 003.105 2.289z" />
            </svg>
        </button>
        </form>
    </div>
</div>
or replace everything in pages/index.js with the following code:
import Head from "next/head";
import custombg from "/styles/bg.module.css";

export default function Home() {
  return (
    <>
      {/* Head */}
      <Head>
          <title>ChatGPT</title>
          <link rel="icon" href="/openai.png"/>
      </Head>
      {/* Main */}
      <div className={`w-full min-h-full ${custombg.customBg}`}>
        <div className="flex">
          {/* Sidebar */}
          <div className="bg-gray-800 h-screen w-1/5 p-2">
            <div>
              {/* New chat */}
              <div>
                <div className="text-gray-100 flex items-center text-xl p-3  bg-gray-900 rounded-md border border-slate-600 shadow-md m-1 hover:bg-gray-700" onClick="">
                    <svg xmlns="http://www.w3.org/2000/svg" fill="none" viewBox="0 0 24 24" strokeWidth={1.5} stroke="currentColor" className="w-6 h-6">
                      <path strokeLinecap="round" strokeLinejoin="round" d="M12 6v12m6-6H6" />
                    </svg>
                    <h2 className="text-sm px-1">
                        New chat
                    </h2>
                </div>
              </div>
              {/* Prompts */}
              <div>
                  <h2 className="text-sm px-2 py-1 text-gray-100">
                        Prompt options:
                  </h2>
                  <div className="p-1 flex justify-center">
                    <select onChange="" className="form-select appearance-none
                    block
                    w-full
                    px-3
                    py-1.5
                    text-gray-100
                    bg-gray-900 bg-clip-padding bg-no-repeat
                    border border-slate-600
                    rounded
                    transition
                    ease-in-out
                    m-0
                    focus:text-gray-100 focus:bg-gray-900 focus:border-slate-600 focus:outline-none">
                    {/* Prompts select button  */}
                    </select>
                  </div>
              </div>
            </div>
          </div>
          {/* Main area */}
          <div className="w-4/5 relative">
            {/* Text input area */}
            <div>
              <div className="p-5 absolute bottom-0 right-0 left-0">
                <div className="flex justify-center mb-2">
                  {/* ClocLoader */}
                </div>
                <form className="relative" onSubmit="">
                  <input
                    type="text"
                    placeholder= "Start chatting"
                    value=""
                    required
                    onChange=""
                    rows="1"
                    className="block p-2.5 w-full text-sm text-gray-50 bg-gray-700 rounded-lg focus:outline-none ring-gray-500 focus:border-gray-500 shadow-md"
                  />
                  <button type="submit" className="right-2 bottom-3 absolute pr-2" >
                    <svg xmlns="http://www.w3.org/2000/svg" viewBox="0 0 20 20" fill="gray" className="w-5 h-5">
                      <path d="M3.105 2.289a.75.75 0 00-.826.95l1.414 4.925A1.5 1.5 0 005.135 9.25h6.115a.75.75 0 010 1.5H5.135a1.5 1.5 0 00-1.442 1.086l-1.414 4.926a.75.75 0 00.826.95 28.896 28.896 0 0015.293-7.154.75.75 0 000-1.115A28.897 28.897 0 003.105 2.289z" />
                    </svg>
                  </button>
                </form>
              </div>
            </div>
          </div>
        </div>
      </div>

    </>
  )
}You should now see your page like this:

Building the chat component
For the chat area, we're going to make a new component that shows the chat between you and the OpenAI. Let's create a new folder called components and a new file called chat.js inside the folder. It should be components/chat.js .
Paste the following code:
import Image from "next/image"
import profilePic from "/public/user.png";
import openAIPic from "/public/openai.png";
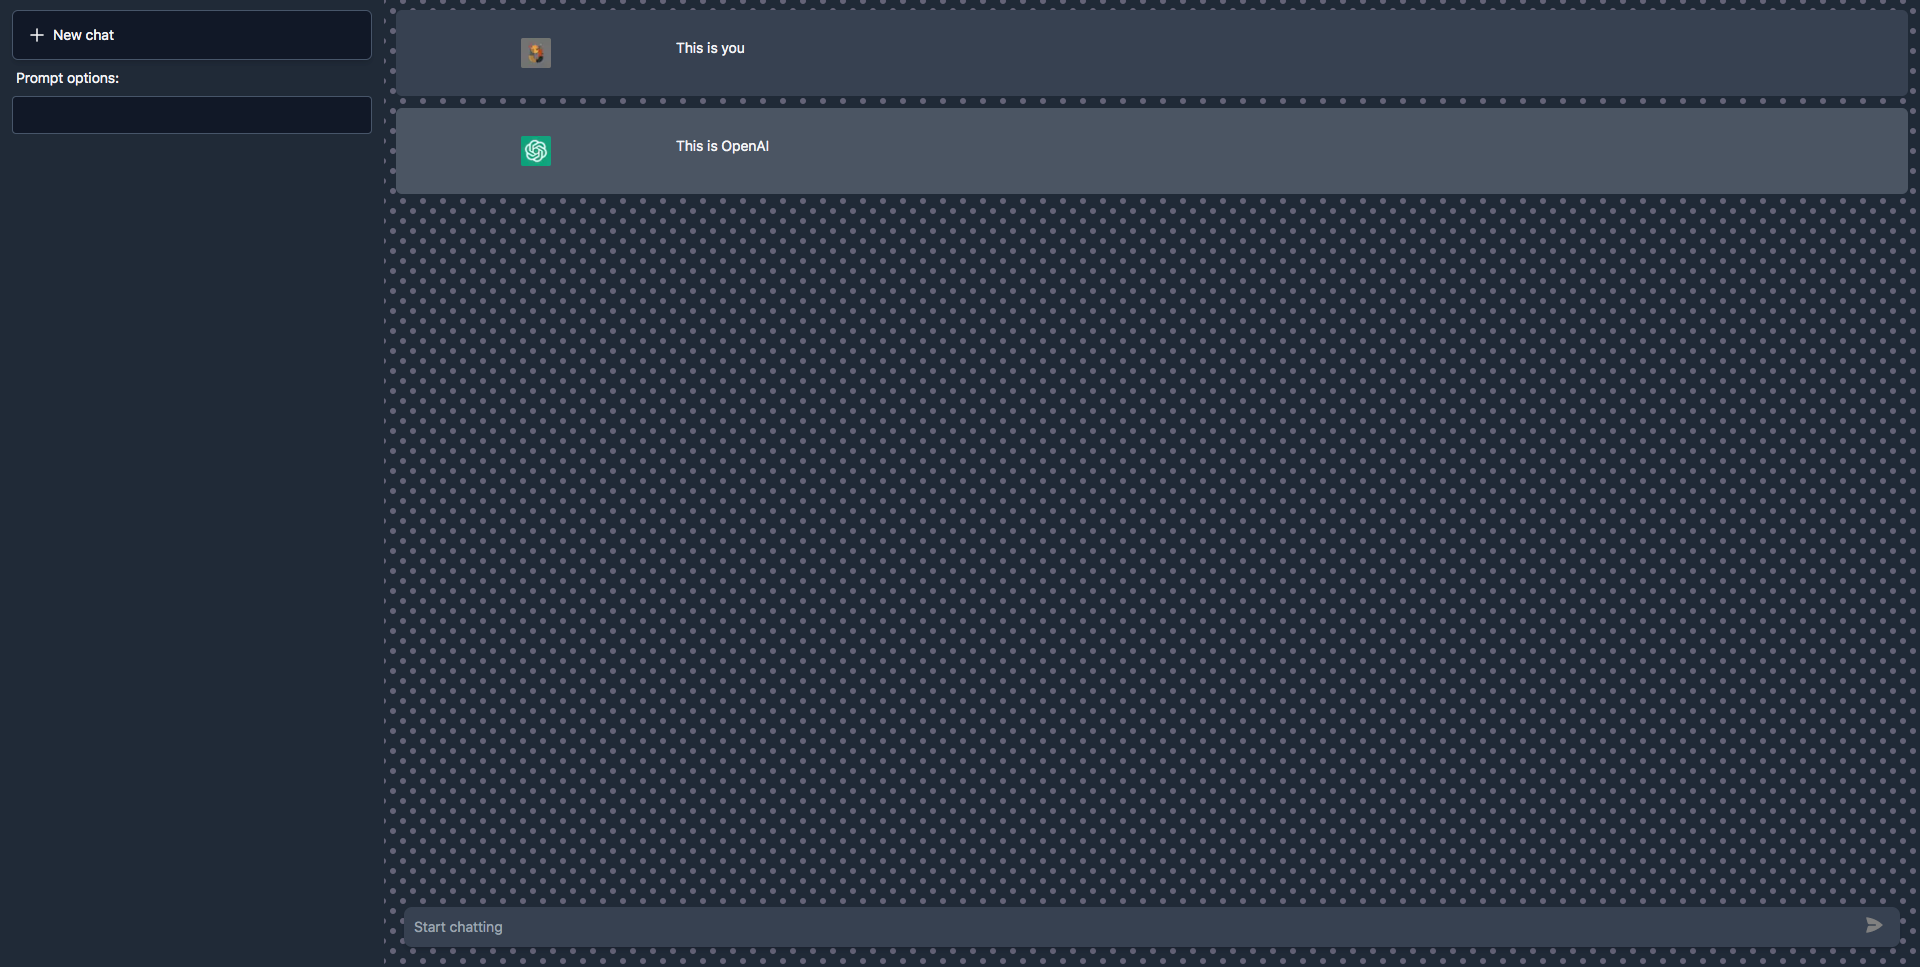
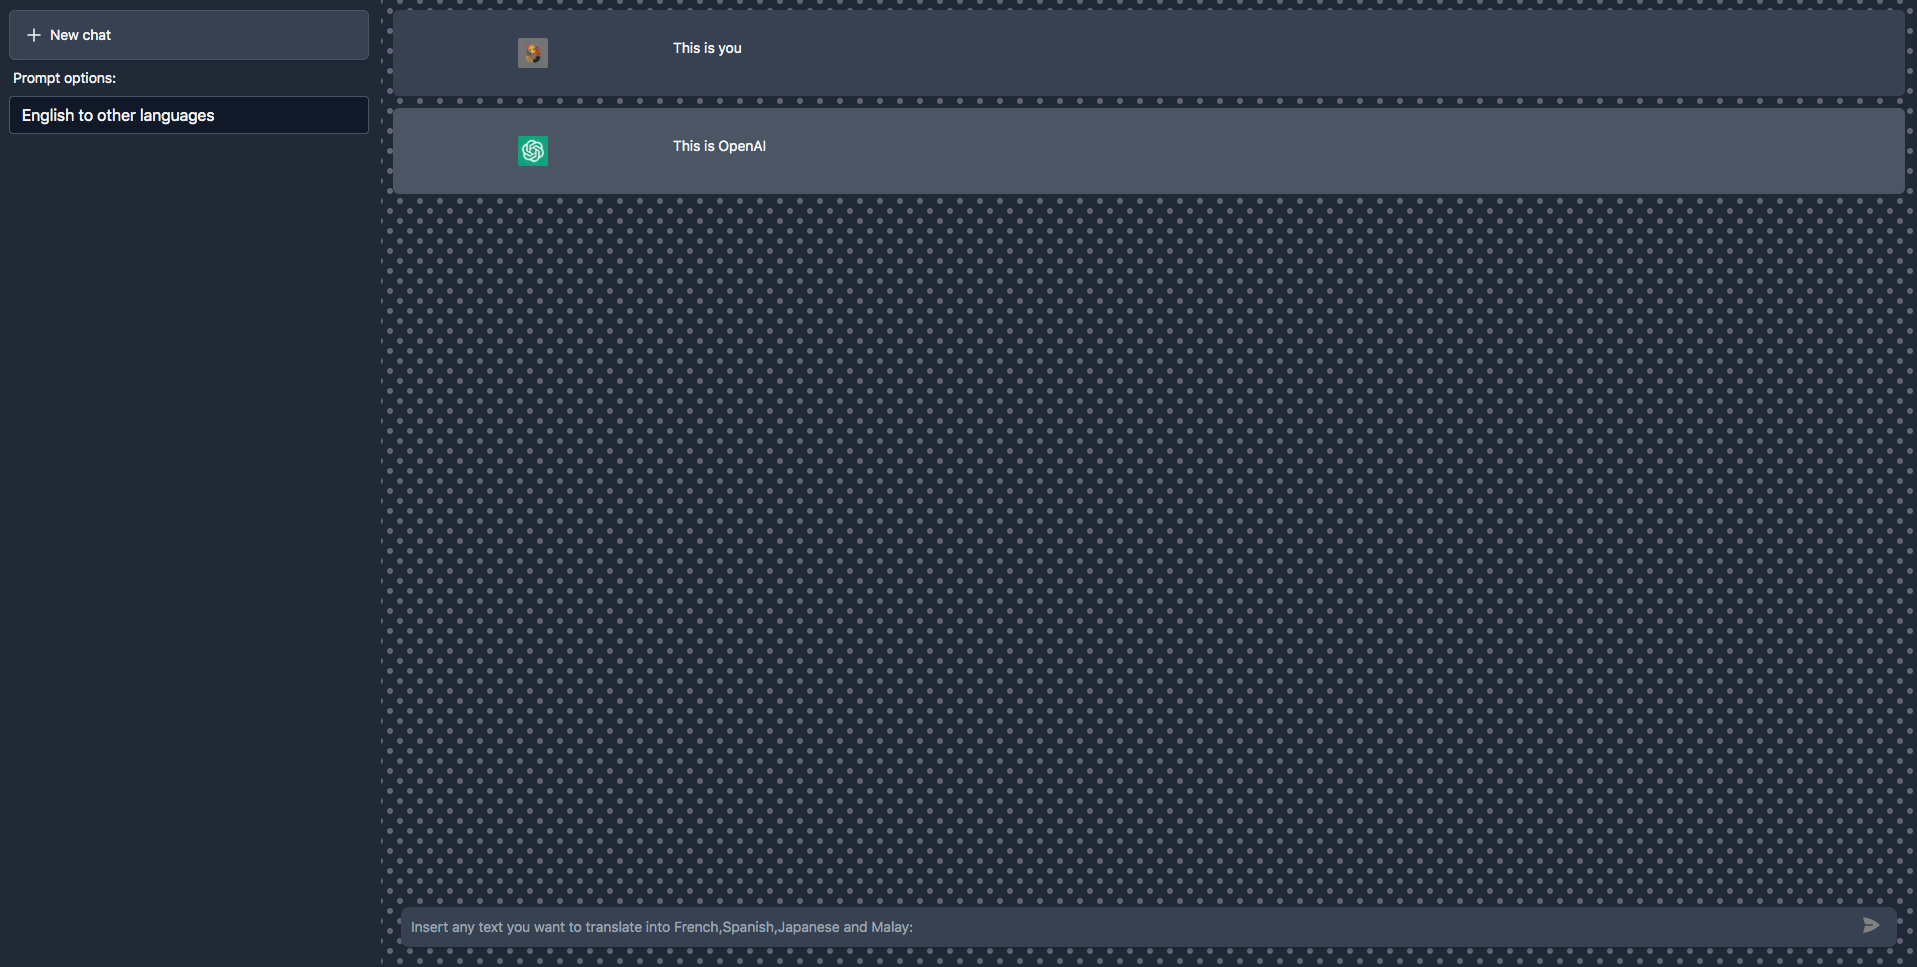
export default function Chat({user}) {
return (
<>
<div id="chat" className="flex justify-center m-3 pr-28 py-7 rounded-md bg-gray-700 ">
<div className="w-1/5">
<Image
src= {profilePic}
className="ml-auto mr-auto rounded-sm"
alt="picture of you"
width={30}
height={30}
/>
</div>
<div className="w-4/5 text-gray-100 text-sm" style={{whiteSpace: 'pre-wrap'}}>
This is you
</div>
</div>
<div id="chat" className="flex justify-center m-3 pr-28 py-7 rounded-md bg-gray-600 ">
<div className="w-1/5">
<Image
src= {openAIPic}
className="ml-auto mr-auto rounded-sm"
alt="picture of you"
width={30}
height={30}
/>
</div>
<div className="w-4/5 text-gray-100 text-sm" style={{whiteSpace: 'pre-wrap'}}>
This is OpenAI
</div>
</div>
</>
)
}You can use this image for the profilePic. Put it in the public folder.
Now we've finished the UI of our app. For the moment it's just the mockup of how we wanted it to be when the real conversation is happening.
Preparing OpenAI API key
We need the API key to connect to the OpenAI API. Let's go to the OpenAI website, you need an account to get the API key. Create one if you don't have an account. Click on your profile picture and "view API key". Create a new secret key.

Once you're done, create a new file called .env in the root folder and paste this code:
OPENAI_API_KEY=paste your secret key after the = sign.
Create a prompt list
When requesting from the API we have to provide them with some parameters including the prompt we want to send, model, temperature, max_tokens, and more.
request : {
        model: "text-davinci-003",
        prompt: "",
        temperature: 0.9,
        max_tokens: 150,
        top_p: 1,
        frequency_penalty: 0,
        presence_penalty: 0.6,
        stop: [" Human:", " AI:"],
}To understand more about this check them out on the OpenAI website. This is basically how you can control which model completes your request by changing the model.
OpenAI has provided a Playground where you can test and play with these settings before you want to put them in your app.
Now, we wanted to have 3 different setups for 3 different purposes, AI assistant, English to other languages, and image generator. Lets's create an array where we can save all these setups.
Put the following code in your pages/index.js file:
const promptList = [
  {
      name: "AI assistant",
      request : {
        model: "text-davinci-003",
        prompt: "",
        temperature: 0.9,
        max_tokens: 150,
        top_p: 1,
        frequency_penalty: 0,
        presence_penalty: 0.6,
        stop: [" Human:", " AI:"],
      }
  },
  {
      name: "English to other languages",
      request: {
        model: "text-davinci-003",
        prompt: "",
        temperature: 0.1,
        max_tokens: 200,
        top_p: 1.0,
        frequency_penalty: 0.0,
        presence_penalty: 0.0,
      }
  },
  {
      name: "Image generator",
      request: {
        prompt: "",
        n: 1,
        size: "512x512",
      }
  }
]
export {promptList};
Now your pages/index.js should look like this:
import Chat from "@/components/chat";
import Head from "next/head";
import custombg from "/styles/bg.module.css";

const promptList = [
  {
      name: "AI assistant",
      request : {
        model: "text-davinci-003",
        prompt: "",
        temperature: 0.9,
        max_tokens: 150,
        top_p: 1,
        frequency_penalty: 0,
        presence_penalty: 0.6,
        stop: [" Human:", " AI:"],
      }
  },
  {
      name: "English to other languages",
      request: {
        model: "text-davinci-003",
        prompt: "",
        temperature: 0.1,
        max_tokens: 200,
        top_p: 1.0,
        frequency_penalty: 0.0,
        presence_penalty: 0.0,
      }
  },
  {
      name: "Image generator",
      request: {
        prompt: "",
        n: 1,
        size: "512x512",
      }
  }
]

export default function Home() {
  return (
    <>
      {/* Head */}
      <Head>
          <title>ChatGPT</title>
          <link rel="icon" href="/openai.png"/>
      </Head>
      {/* Main */}
      <div className={`w-full min-h-full ${custombg.customBg}`}>
        <div className="flex">
          {/* Sidebar */}
          <div className="bg-gray-800 h-screen w-1/5 p-2">
            <div>
              {/* New chat */}
              <div>
                <div className="text-gray-100 flex items-center text-xl p-3  bg-gray-900 rounded-md border border-slate-600 shadow-md m-1 hover:bg-gray-700" onClick="">
                    <svg xmlns="http://www.w3.org/2000/svg" fill="none" viewBox="0 0 24 24" strokeWidth={1.5} stroke="currentColor" className="w-6 h-6">
                      <path strokeLinecap="round" strokeLinejoin="round" d="M12 6v12m6-6H6" />
                    </svg>
                    <h2 className="text-sm px-1">
                        New chat
                    </h2>
                </div>
              </div>
              {/* Prompts */}
              <div>
                  <h2 className="text-sm px-2 py-1 text-gray-100">
                        Prompt options:
                  </h2>
                  <div className="p-1 flex justify-center">
                    <select onChange="" className="form-select appearance-none
                    block
                    w-full
                    px-3
                    py-1.5
                    text-gray-100
                    bg-gray-900 bg-clip-padding bg-no-repeat
                    border border-slate-600
                    rounded
                    transition
                    ease-in-out
                    m-0
                    focus:text-gray-100 focus:bg-gray-900 focus:border-slate-600 focus:outline-none">
                    {/* Prompts select button  */}
                    </select>
                  </div>
              </div>
            </div>
          </div>
          {/* Main area */}
          <div className="w-4/5 relative">
            {/* Chat area */}
            <div id="chat" className="h-[90vh] overflow-auto scrollbar">
                <Chat/>
            </div>
            {/* Text input area */}
            <div>
              <div className="p-5 absolute bottom-0 right-0 left-0">
                <div className="flex justify-center mb-2">
                  {/* ClocLoader */}
                </div>
                <form className="relative" onSubmit="">
                  <input
                    type="text"
                    placeholder= "Start chatting"
                    value=""
                    required
                    onChange=""
                    rows="1"
                    className="block p-2.5 w-full text-sm text-gray-50 bg-gray-700 rounded-lg focus:outline-none ring-gray-500 focus:border-gray-500 shadow-md"
                  />
                  <button type="submit" className="right-2 bottom-3 absolute pr-2" >
                    <svg xmlns="http://www.w3.org/2000/svg" viewBox="0 0 20 20" fill="gray" className="w-5 h-5">
                      <path d="M3.105 2.289a.75.75 0 00-.826.95l1.414 4.925A1.5 1.5 0 005.135 9.25h6.115a.75.75 0 010 1.5H5.135a1.5 1.5 0 00-1.442 1.086l-1.414 4.926a.75.75 0 00.826.95 28.896 28.896 0 0015.293-7.154.75.75 0 000-1.115A28.897 28.897 0 003.105 2.289z" />
                    </svg>
                  </button>
                </form>
              </div>
            </div>
          </div>
        </div>
      </div>

    </>
  )
}Build the prompt component
Once we have the prompt list, let's create a component where we can select one prompt at a time. Create a new file components/prompts.js and paste the following code:
import { promptList} from "@/pages"
export default function Prompts() {
    return (
            <>
                {promptList.map((prompt) => (
                    <option key={prompt.name} value={prompt.name}>{prompt.name}</option>
                ))}
            </>
    )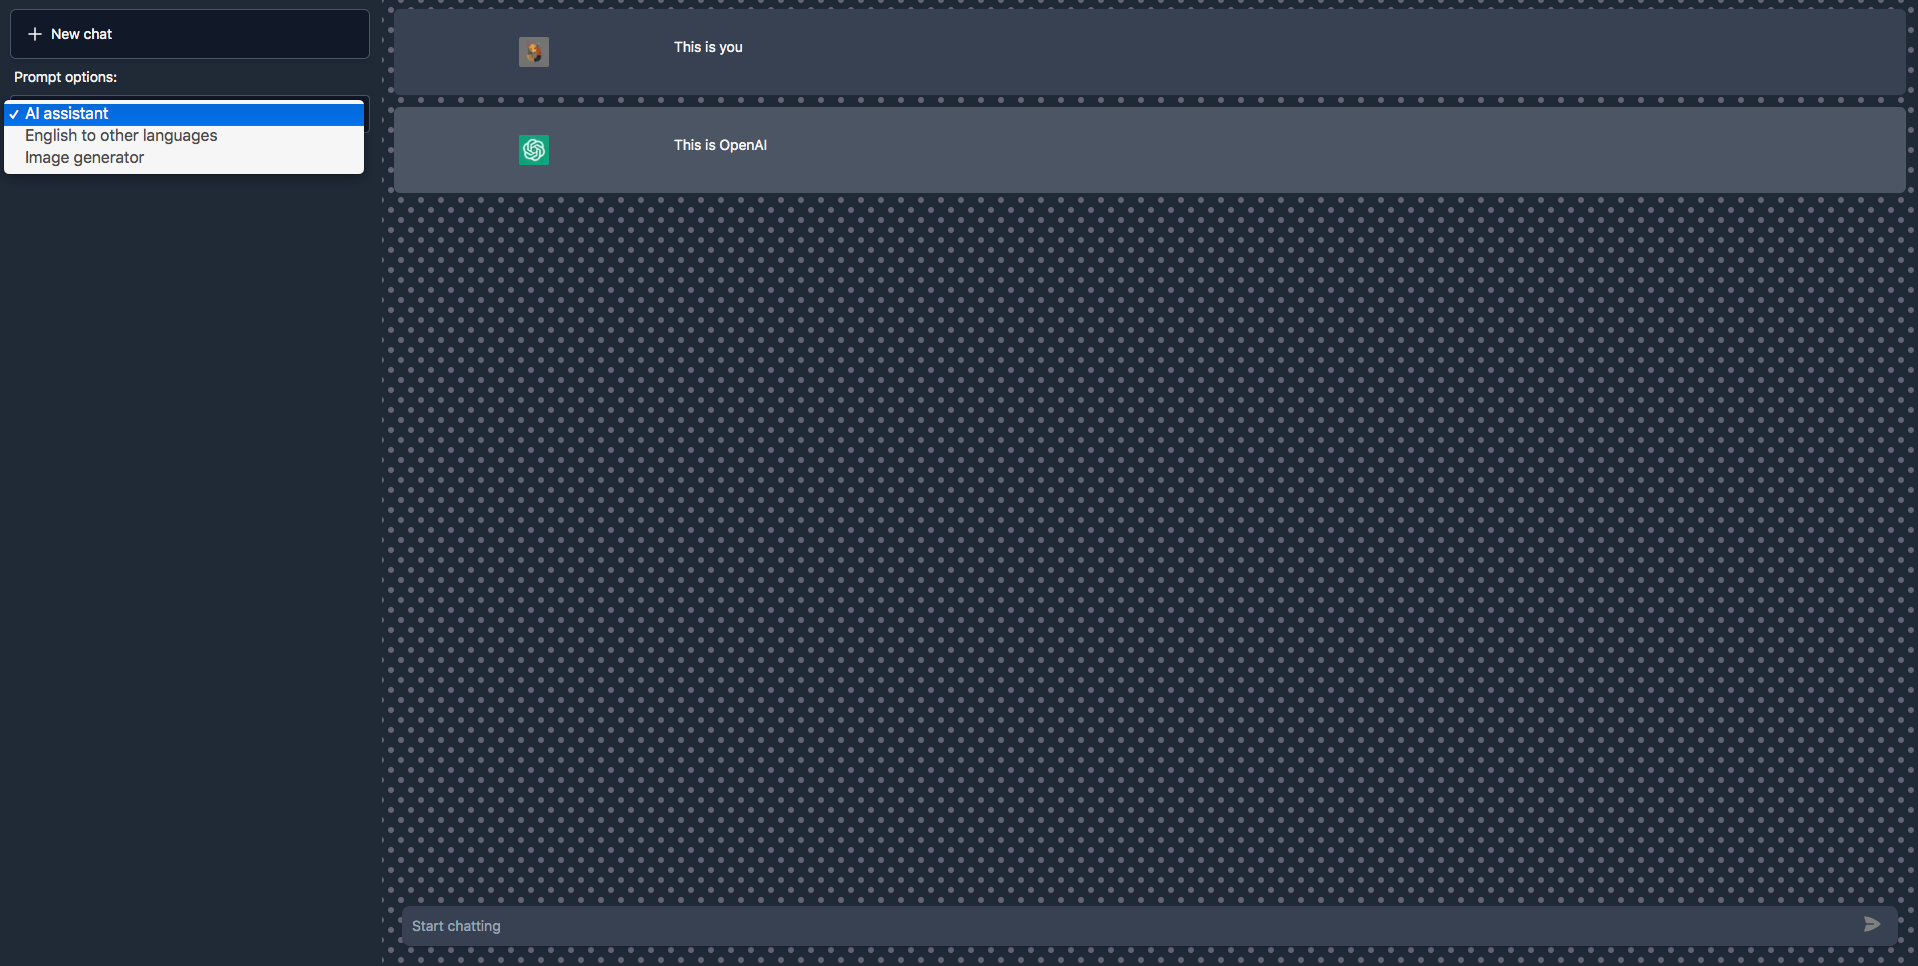
}What happens in this code is it exports a functional component "Prompts" which returns a list of options in the form of a drop-down menu.
- The code starts with an import statement that imports the "promptList" variable from the file "@/pages" which is from our
index.js. The "@" symbol in the file path represents the root directory of the project. - The "promptList" is an array of objects, where each object represents a prompt. The ".map" function iterates through each item in the array, creating a new "option" element for each prompt. The "key" and "value" attributes are set to the "name" property of the prompt, and the text content of the "option" element is also set to the "name" property of the prompt.
The result of this code will be a drop-down menu that displays a list of prompts, with each prompt as an option in the menu.
In pages/index.js, we can now add the Prompts component:
import the component at the top of pages/index.js then add the component:
import Prompts from "@/components/prompts";<div className="p-1 flex justify-center">
<select onChange="" className="form-select appearance-none
block
w-full
px-3
py-1.5
text-gray-100
bg-gray-900 bg-clip-padding bg-no-repeat
border border-slate-600
rounded
transition
ease-in-out
m-0
focus:text-gray-100 focus:bg-gray-900 focus:border-slate-600 focus:outline-none">
{/* Prompts select button */}
<Prompts/> //<--- Where you add the component
</select>
</div>Now you can use the select button.
Handle Submit function
It's time to take the input and handle them when we enter the prompt. Replace the code the <form> tag with this code:
<form className="relative" onSubmit="">
    <input
    type="text"
    placeholder= {generatePlaceholder(currentPrompt)}
    value={userInput}
    required
    onChange={(e)=>setUserInput(e.target.value)}
    rows="1"
    className="block p-2.5 w-full text-sm text-gray-50 bg-gray-700 rounded-lg focus:outline-none ring-gray-500 focus:border-gray-500 shadow-md"
    />
    <button type="submit" className="right-2 bottom-3 absolute pr-2" >
    <svg xmlns="http://www.w3.org/2000/svg" viewBox="0 0 20 20" fill="gray" className="w-5 h-5">
    <path d="M3.105 2.289a.75.75 0 00-.826.95l1.414 4.925A1.5 1.5 0 005.135 9.25h6.115a.75.75 0 010 1.5H5.135a1.5 1.5 0 00-1.442 1.086l-1.414 4.926a.75.75 0 00.826.95 28.896 28.896 0 0015.293-7.154.75.75 0 000-1.115A28.897 28.897 0 003.105 2.289z" />
    </svg>
    </button>
</form>We've updated the form properties to make it do something when we submit some text.
placeholderis set to the result of calling thegeneratePlaceholderfunction and passing in thecurrentPrompt.valueis set to the "userInput" state.requiredis a boolean attribute that specifies the input must be filled out before the form can be submitted.onChangeis an event handler that sets theuserInputstate when the input value changes. ThesetUserInputfunction is called and passed the event target's value.
Now, let's declare all the states and functions needed to make it work.
Create clearChat function for the New chat button
Import and declare the mesages useState Hook under the export default function Home() function and create a clearChat function.
import { useState } from "react";

//...code

export default function Home() {
  // Save and set conversation
  const [messages, setMessages] = useState([]);

  // Set a new chat
  function clearChat() {
    setMessages([]);
  }
}- The
useStateis a hook, that is used to save and set a conversation between two users. The hook is invoked with an initial value of an empty array, which is used to store the messages in the conversation. The hook returns an array with two elements, the first is the current state value (in this case,messages), and the second is a setter function that updates the state value (in this case,setMessages). - We also include a function called
clearChatwhich sets a new chat. This function is called by setting the state valuemessagesto an empty array using thesetMessagessetter function. This will clear any existing messages and start a new chat.
Call the clearChat function in the New chat button onClick event handler.
{/* New chat */}
<div>
    <div className="text-gray-100 flex items-center text-xl p-3  bg-gray-900 rounded-md border border-slate-600 shadow-md m-1 hover:bg-gray-700" onClick={clearChat}>
    <svg xmlns="http://www.w3.org/2000/svg" fill="none" viewBox="0 0 24 24" strokeWidth={1.5} stroke="currentColor" className="w-6 h-6">
    <path strokeLinecap="round" strokeLinejoin="round" d="M12 6v12m6-6H6" />
    </svg>
    <h2 className="text-sm px-1">
    New chat
    </h2>
    </div>
</div>
But nothing will happen when you hit the new Chat button, simply because we don't have any chat yet. You will see it in action when later in this tutorial.
Create setPrompt function for the prompt select button
Let's declare the currentPrompt useState Hook under the export default function Home() and create a SetPrompt and generatePlaceholderfunction.
// To generate placeholder
function generatePlaceholder(currentPrompt) {
  switch(currentPrompt) {
    case promptList[0].name:
      return "Start chatting"
    case promptList[1].name:
      return "Insert any text you want to translate into French,Spanish,Japanese and Malay: "
    case promptList[2].name:
      return "Insert your prompt to generate image:"
    default:
      return "Start chatting."
  }
}

export default function Home() {
  // .....code

  // Save and set current prompt
  const [currentPrompt, setCurrentPrompt] = useState(`AI assistant`);

  // .... code

  // Set prompt
  function setPrompt(event) {
    event.preventDefault();
    clearChat();
    setCurrentPrompt(event.target.value);
  }
}- We start with a function called
generatePlaceholderwhich generates a placeholder string based on the current prompt. This function takes thecurrentPromptas an argument and returns a different placeholder string based on the value ofcurrentPrompt. - The
generatePlaceholderfunction uses a switch statement to determine the correct placeholder string based on the current prompt. If the current prompt is equal to the first element in the "promptList" array, the function returns the string "Start chatting". If the current prompt is equal to the second element in the "promptList" array, the function returns the string "Insert any text you want to translate into French, Spanish, Japanese, and Malay:". If the current prompt is equal to the third element in the "promptList" array, the function returns the string "Insert your prompt to generate image:". If the current prompt does not match any of these cases, the function returns the string "Start chatting." - Then we declare
useStatehook to save and set the current prompt. The hook is invoked with an initial value of "AI assistant", which is used to store the current prompt. The hook returns an array with two elements, the first is the current state value (in this case,currentPrompt), and the second is a setter function that updates the state value (in this case,setCurrentPrompt). - The component also includes a function called
setPromptwhich sets the current prompt. This function is called when we set the prompt through the prompt select button, and it's triggered by an event. The function starts by calling "event.preventDefault()", which prevents the default behavior of the event (e.g., a form submission reloading the page). - Next, the function calls the
clearChatfunction to clear any existing chat messages so that we can have a fresh conversation when we want to change the prompt. Then, the function callssetCurrentPromptand passes in the value of the event target to set the current prompt. - The
setPromptfunction is used to update the current prompt whenever you select a new prompt from a select button. The new prompt will be displayed as the placeholder text in an input field, and you can start typing your response based on the placeholder.
Call the setPrompt function in the select button onchange event handler.
<select onChange={setPrompt} className="form-select appearance-none
    block
    w-full
    px-3
    py-1.5
    text-gray-100
    bg-gray-900 bg-clip-padding bg-no-repeat
    border border-slate-600
    rounded
    transition
    ease-in-out
    m-0
    focus:text-gray-100 focus:bg-gray-900 focus:border-slate-600 focus:outline-none">
    {/* Prompts select button  */}
    <Prompts/>
</select>
Now when you select a different prompt option, you will see the placeholder is changing according to the selected prompt.
currentPrompt.If it’s still not working, your current pages/index.js should look like this:
import Chat from "@/components/chat";
import Prompts from "@/components/prompts";
import Head from "next/head";
import custombg from "/styles/bg.module.css";
import { useState } from "react";

const promptList = [
  {
      name: "AI assistant",
      request : {
        model: "text-davinci-003",
        prompt: "",
        temperature: 0.9,
        max_tokens: 150,
        top_p: 1,
        frequency_penalty: 0,
        presence_penalty: 0.6,
        stop: [" Human:", " AI:"],
      }
  },
  {
      name: "English to other languages",
      request: {
        model: "text-davinci-003",
        prompt: "",
        temperature: 0.1,
        max_tokens: 200,
        top_p: 1.0,
        frequency_penalty: 0.0,
        presence_penalty: 0.0,
      }
  },
  {
      name: "Image generator",
      request: {
        prompt: "",
        n: 1,
        size: "512x512",
      }
  }
]
export {promptList};

// To generate placeholder
function generatePlaceholder(currentPrompt) {
  switch(currentPrompt) {
    case promptList[0].name:
      return "Start chatting"
    case promptList[1].name:
      return "Insert any text you want to translate into French,Spanish,Japanese and Malay: "
    case promptList[2].name:
      return "Insert your prompt to generate image:"
    default:
      return "Start chatting."
  }
}

export default function Home() {
  // Save and set conversation
  const [messages, setMessages] = useState([]);
  // Save and set current prompt
  const [currentPrompt, setCurrentPrompt] = useState(`AI assistant`);
  // Save and set userinput
  const [userInput,setUserInput] = useState("");

  // Set a new chat
  function clearChat() {
    setMessages([]);
  }

  // Set prompt
  function setPrompt(event) {
    event.preventDefault();
    clearChat();
    setCurrentPrompt(event.target.value);
  }

  return (
    <>
      {/* Head */}
      <Head>
          <title>ChatGPT</title>
          <link rel="icon" href="/openai.png"/>
      </Head>
      {/* Main */}
      <div className={`w-full min-h-full ${custombg.customBg}`}>
        <div className="flex">
          {/* Sidebar */}
          <div className="bg-gray-800 h-screen w-1/5 p-2">
            <div>
              {/* New chat */}
              <div>
                <div className="text-gray-100 flex items-center text-xl p-3  bg-gray-900 rounded-md border border-slate-600 shadow-md m-1 hover:bg-gray-700" onClick={clearChat}>
                    <svg xmlns="http://www.w3.org/2000/svg" fill="none" viewBox="0 0 24 24" strokeWidth={1.5} stroke="currentColor" className="w-6 h-6">
                      <path strokeLinecap="round" strokeLinejoin="round" d="M12 6v12m6-6H6" />
                    </svg>
                    <h2 className="text-sm px-1">
                        New chat
                    </h2>
                </div>
              </div>
              {/* Prompts */}
              <div>
                  <h2 className="text-sm px-2 py-1 text-gray-100">
                        Prompt options:
                  </h2>
                  <div className="p-1 flex justify-center">
                    <select onChange={setPrompt} className="form-select appearance-none
                    block
                    w-full
                    px-3
                    py-1.5
                    text-gray-100
                    bg-gray-900 bg-clip-padding bg-no-repeat
                    border border-slate-600
                    rounded
                    transition
                    ease-in-out
                    m-0
                    focus:text-gray-100 focus:bg-gray-900 focus:border-slate-600 focus:outline-none">
                    {/* Prompts select button  */}
                    <Prompts/>
                    </select>
                  </div>
              </div>
            </div>
          </div>
          {/* Main area */}
          <div className="w-4/5 relative">
            {/* Chat area */}
            <div id="chat" className="h-[90vh] overflow-auto scrollbar">
                <Chat/>
            </div>
            {/* Text input area */}
            <div>
              <div className="p-5 absolute bottom-0 right-0 left-0">
                <div className="flex justify-center mb-2">
                  {/* ClocLoader */}
                </div>
                <form className="relative" onSubmit="">
                  <input
                    type="text"
                    placeholder= {generatePlaceholder(currentPrompt)}
                    value={userInput}
                    required
                    onChange={(e)=>setUserInput(e.target.value)}
                    rows="1"
                    className="block p-2.5 w-full text-sm text-gray-50 bg-gray-700 rounded-lg focus:outline-none ring-gray-500 focus:border-gray-500 shadow-md"
                  />
                  <button type="submit" className="right-2 bottom-3 absolute pr-2" >
                    <svg xmlns="http://www.w3.org/2000/svg" viewBox="0 0 20 20" fill="gray" className="w-5 h-5">
                      <path d="M3.105 2.289a.75.75 0 00-.826.95l1.414 4.925A1.5 1.5 0 005.135 9.25h6.115a.75.75 0 010 1.5H5.135a1.5 1.5 0 00-1.442 1.086l-1.414 4.926a.75.75 0 00.826.95 28.896 28.896 0 0015.293-7.154.75.75 0 000-1.115A28.897 28.897 0 003.105 2.289z" />
                    </svg>
                  </button>
                </form>
              </div>
            </div>
          </div>
        </div>
      </div>

    </>
  )
}Create submit function to handle the input
This function is going to be an async function. Since we're going to fetch the API from here, it allows our application to continue processing other tasks while it waits for the result of this asynchronous function.
Under the Home function, let's create a function called submit .
export default function Home() {
	// .....code

    // Handle submit
  async function submit(event) {
    event.preventDefault();

  }

  // .....code
}
Don't forget to call this function for onSubmit event handler in <form> tag
// .....code
<form className="relative" onSubmit={submit}>
// .....code- Currently, we use
event.preventDefaultto prevent it from doing the default behavior which is to refresh the page and send the form data to the server. Because we wanted to use JavaScript to submit the form, we prevent this behavior.
The next thing we want to do when we receive the input is to show them in the chat area. First, we have to differentiate which one is us and which one is OpenAI. Let's declare an object for that purpose.
export default function Home() {
   // .....code

   // message type
  const messageType = {me: "me", openAI: "openAI"};

  // .....code
}
Next, we can now save userInput into the messages state.
  // Handle submit
  async function submit(event) {
    event.preventDefault();
    // temporary
    let tempMessages = [...messages, {user: `${messageType.me}`, message: `${userInput}`}];
    // put the userInput in the messages
    setMessages(tempMessages);
    // clear user input
    setUserInput("");
}- The first line of the function calls
event.preventDefault()which is used to prevent the default behavior of a submit event, which is to refresh the page. - Then, the function creates a new array
tempMessageswhich contains the currentmessagesarray and a new object that represents the user's input message. The new object contains two properties:messageTypewhich is equal tomessageType.meandmessagewhich is equal touserInput. - The function then sets the
messagesstate to the newtempMessagesarray using thesetMessagesfunction and clear user input bysetUserInputto "".
Show the message in the chat area
Open components/chat.js and replace everything with this code:
import Image from "next/image";
import profilePic from "/public/user.png";
import openAIPic from "/public/openai.png";


export default function Chat({user}) {

    return (
            <div id="chat" className={`flex justify-center m-3 pr-28 py-7 rounded-md ${user.user === "me" ? "bg-gray-700" : "bg-gray-600"} `}>
                <div className="w-1/5">
                    <Image
                        src= {user.user === "me" ? profilePic : openAIPic}
                        className="ml-auto mr-auto rounded-sm"
                        alt="picture of you"
                        width={30}
                        height={30}
                    />
                </div>
                <div className="w-4/5 text-gray-100 text-sm" style={{whiteSpace: 'pre-wrap'}}>
                   {user.image ? <img src={user.image}/> : user.message}
                </div>
            </div>
    )
}in index.js we should check if there's at least one message to show them in the chat area. Then we loop through every message and pass user into the chat component as a prop. Replace everything in the {/* Chat area */} with this code:
{/* Chat area */}
<div id="chat" className="h-[90vh] overflow-auto scrollbar">
    {messages.length > 0 &&
    messages.map((user, index)=>(
    	<Chat key={index} user={user}/>
    ))
    }
</div>
If everything is done correctly, you can now type some messages and they will appear in the chat area. Also when you click the New chat, it will reset the chat area for a new conversation.

here is the full pages/index.js code for your reference:
import Chat from "@/components/chat";
import Prompts from "@/components/prompts";
import Head from "next/head";
import custombg from "/styles/bg.module.css";
import { useState } from "react";

const promptList = [
  {
      name: "AI assistant",
      request : {
        model: "text-davinci-003",
        prompt: "",
        temperature: 0.9,
        max_tokens: 150,
        top_p: 1,
        frequency_penalty: 0,
        presence_penalty: 0.6,
        stop: [" Human:", " AI:"],
      }
  },
  {
      name: "English to other languages",
      request: {
        model: "text-davinci-003",
        prompt: "",
        temperature: 0.1,
        max_tokens: 200,
        top_p: 1.0,
        frequency_penalty: 0.0,
        presence_penalty: 0.0,
      }
  },
  {
      name: "Image generator",
      request: {
        prompt: "",
        n: 1,
        size: "512x512",
      }
  }
]
export {promptList};

// To generate placeholder
function generatePlaceholder(currentPrompt) {
  switch(currentPrompt) {
    case promptList[0].name:
      return "Start chatting"
    case promptList[1].name:
      return "Insert any text you want to translate into French,Spanish,Japanese and Malay: "
    case promptList[2].name:
      return "Insert your prompt to generate image:"
    default:
      return "Start chatting."
  }
}

export default function Home() {
  // Save and set conversation
  const [messages, setMessages] = useState([]);
  // Save and set current prompt
  const [currentPrompt, setCurrentPrompt] = useState(`AI assistant`);
  // Save and set userinput
  const [userInput,setUserInput] = useState("");
  // message type
  const messageType = {me: "me", openAI: "openAI"};

  // Set a new chat
  function clearChat() {
    setMessages([]);
  }

  // Set prompt
  function setPrompt(event) {
    event.preventDefault();
    clearChat();
    setCurrentPrompt(event.target.value);
  }

  // Handle submit
  async function submit(event) {
    event.preventDefault();
    // temporary message
    let tempMessages = [...messages, {user: `${messageType.me}`, message: `${userInput}`}];
    // put the userInput in the messages
    setMessages(tempMessages);
    // clear user input
    setUserInput("");
  }

  return (
    <>
      {/* Head */}
      <Head>
          <title>ChatGPT</title>
          <link rel="icon" href="/openai.png"/>
      </Head>
      {/* Main */}
      <div className={`w-full min-h-full ${custombg.customBg}`}>
        <div className="flex">
          {/* Sidebar */}
          <div className="bg-gray-800 h-screen w-1/5 p-2">
            <div>
              {/* New chat */}
              <div>
                <div className="text-gray-100 flex items-center text-xl p-3  bg-gray-900 rounded-md border border-slate-600 shadow-md m-1 hover:bg-gray-700" onClick={clearChat}>
                    <svg xmlns="http://www.w3.org/2000/svg" fill="none" viewBox="0 0 24 24" strokeWidth={1.5} stroke="currentColor" className="w-6 h-6">
                      <path strokeLinecap="round" strokeLinejoin="round" d="M12 6v12m6-6H6" />
                    </svg>
                    <h2 className="text-sm px-1">
                        New chat
                    </h2>
                </div>
              </div>
              {/* Prompts */}
              <div>
                  <h2 className="text-sm px-2 py-1 text-gray-100">
                        Prompt options:
                  </h2>
                  <div className="p-1 flex justify-center">
                    <select onChange={setPrompt} className="form-select appearance-none
                    block
                    w-full
                    px-3
                    py-1.5
                    text-gray-100
                    bg-gray-900 bg-clip-padding bg-no-repeat
                    border border-slate-600
                    rounded
                    transition
                    ease-in-out
                    m-0
                    focus:text-gray-100 focus:bg-gray-900 focus:border-slate-600 focus:outline-none">
                    {/* Prompts select button  */}
                    <Prompts/>
                    </select>
                  </div>
              </div>
            </div>
          </div>
          {/* Main area */}
          <div className="w-4/5 relative">
            {/* Chat area */}
            <div id="chat" className="h-[90vh] overflow-auto scrollbar">
              {messages.length > 0 &&
                messages.map((user, index)=>(
                  <Chat key={index} user={user}/>
                ))
              }
            </div>
            {/* Text input area */}
            <div>
              <div className="p-5 absolute bottom-0 right-0 left-0">
                <div className="flex justify-center mb-2">
                  {/* ClocLoader */}
                </div>
                <form className="relative" onSubmit={submit}>
                  <input
                    type="text"
                    placeholder= {generatePlaceholder(currentPrompt)}
                    value={userInput}
                    required
                    onChange={(e)=>setUserInput(e.target.value)}
                    rows="1"
                    className="block p-2.5 w-full text-sm text-gray-50 bg-gray-700 rounded-lg focus:outline-none ring-gray-500 focus:border-gray-500 shadow-md"
                  />
                  <button type="submit" className="right-2 bottom-3 absolute pr-2" >
                    <svg xmlns="http://www.w3.org/2000/svg" viewBox="0 0 20 20" fill="gray" className="w-5 h-5">
                      <path d="M3.105 2.289a.75.75 0 00-.826.95l1.414 4.925A1.5 1.5 0 005.135 9.25h6.115a.75.75 0 010 1.5H5.135a1.5 1.5 0 00-1.442 1.086l-1.414 4.926a.75.75 0 00.826.95 28.896 28.896 0 0015.293-7.154.75.75 0 000-1.115A28.897 28.897 0 003.105 2.289z" />
                    </svg>
                  </button>
                </form>
              </div>
            </div>
          </div>
        </div>
      </div>

    </>
  )
}Call the API
First, we have to call the API from the server side which we're going to create later. In pages/index.js find this line of code:
// Handle submit
async function submit(event) {
	// .....code
}
Replace them with the following code:
  // Handle submit
  async function submit(event) {
    event.preventDefault();
    // Get instruction prompt
    const instructionPrompt = generateInstructionPrompt(userInput, currentPrompt)
    // Temporary message
    let tempMessages = [...messages, {user: `${messageType.me}`, message: `${userInput}`}];
    // Put the userInput in the messages
    setMessages(tempMessages);
    // Clear user input
    setUserInput("");

    // Call the API
    try {
      const response = await fetch("api/generate",{
        method: "POST",
        headers: {
          "Content-Type": "application/json",
        },
        body: generateBody(currentPrompt, messages, userInput, tempMessages, instructionPrompt)
      });

      // If we get unsuccessful response
      const data = await response.json();
      if (response.status !== 200) {
        throw data.error || new Error(`Request failed with status ${response.status}`);
      }
      console.log(data.openAI);
      setMessages([...tempMessages, {user: messageType.openAI, message: `${data.openAI && data.openAI.trimStart()}`, image: data.image }]);
    }
    catch (error) {
      // Consider implementing your own error handling logic here
      console.error(error);
      alert(error.message);
    }
  }
submit function.- The function uses the
fetchAPI to make a POST request to the API endpoint/api/generatewith a request body generated by thegenerateBodyfunction. The request body contains information such as the current prompt, messages, user input, temporary messages, and the instruction prompt. - If the API returns a successful response, the function logs the response data and adds the response from OpenAI to the list of messages using the
setMessagesfunction. - If the API returns an unsuccessful response or if an error occurs, the error message is logged to the console and an alert with the error message is displayed to the user.
Generate instruction prompt
OpenAI models can do everything from generating original stories to performing complex text analysis. Because they can do so many things, you have to be explicit in describing what you want. Showing, not just telling, is often the secret to a good prompt. These models can be used as a starting point for your own models, or you can fine-tune them to meet your specific needs.
So we have to show them what we wanted the model to do for us. These are some examples of how to explicitly give them the instructions.
Add the following code in index.js you can put them under the prompList array:
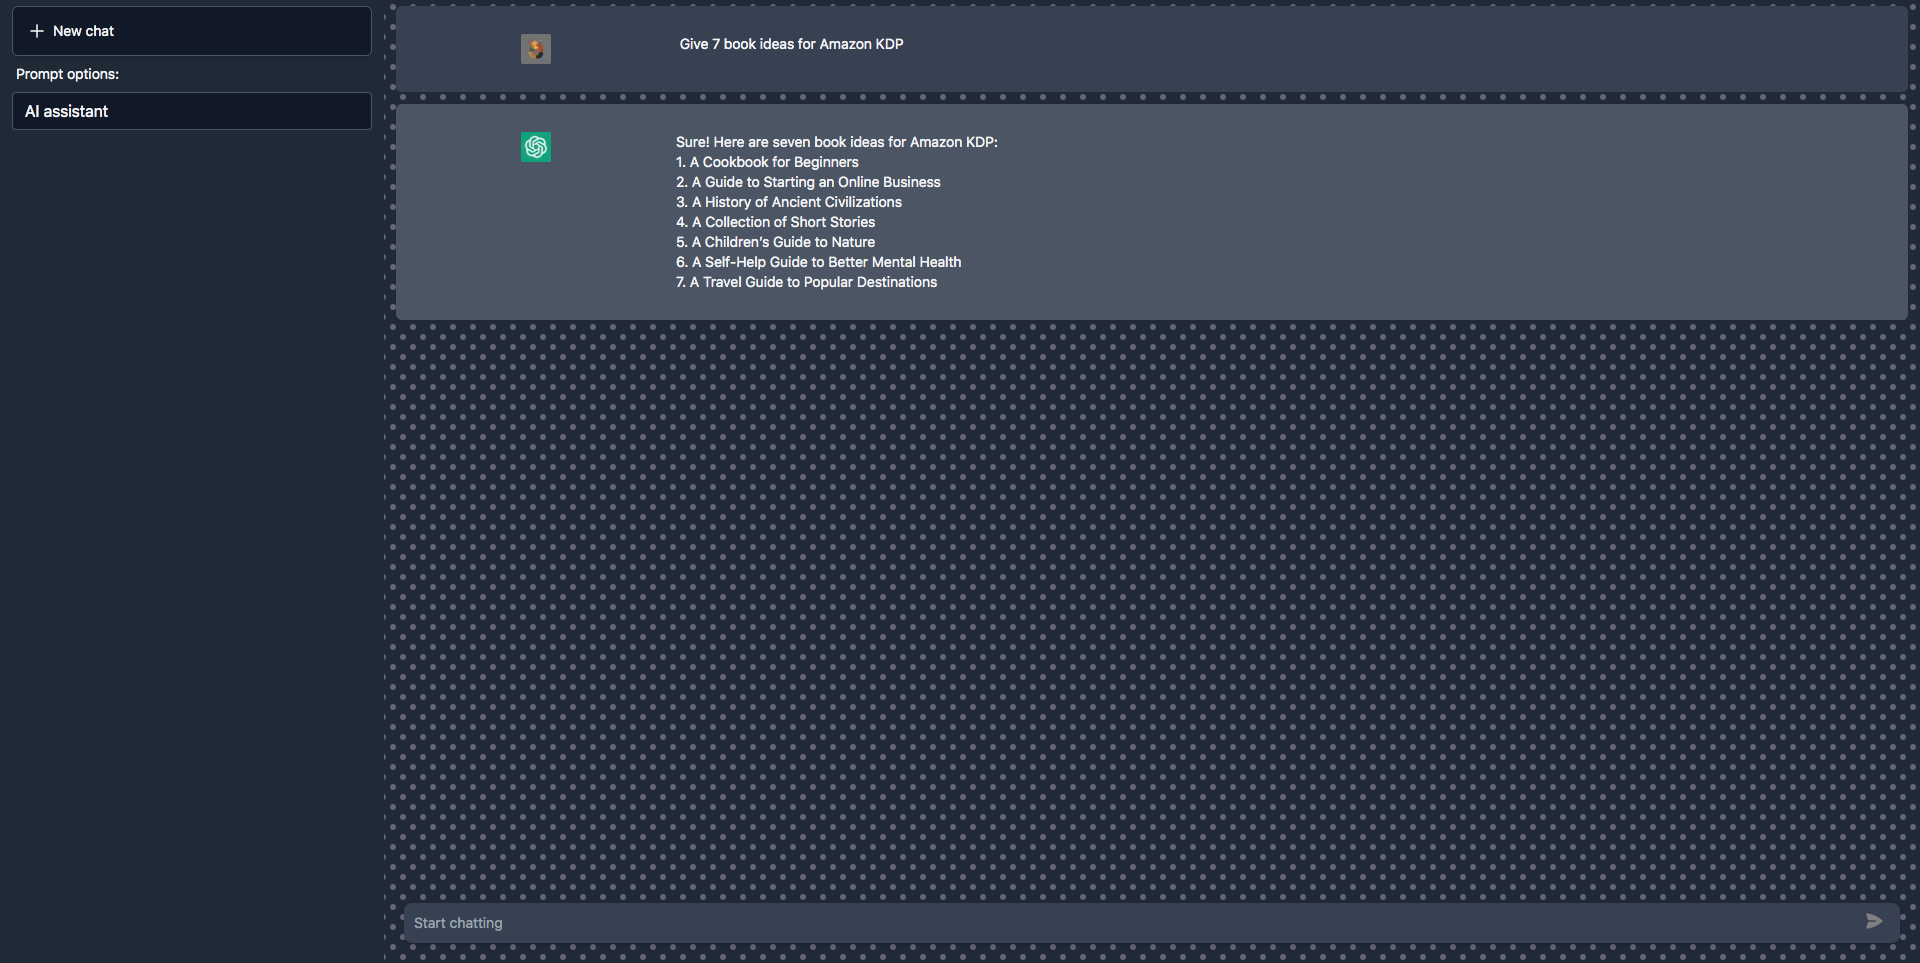
function generateInstructionPrompt(userInput, currentPrompt) {
  let instructionPrompt = ``;
  switch (currentPrompt) {
    case promptList[0].name:
         instructionPrompt = `The following is a conversation with an AI assistant. The assistant is helpful, creative, clever, and very friendly.
         \nHuman: Hello, who are you?
         \nAI: I am an AI created by OpenAI. How can I help you today?
         \nHuman: ${userInput}
         \nAI:`
         break;
    case promptList[1].name:
        instructionPrompt = `Translate this into four languages 1. French, 2. Spanish, 3. Japanese and 4. Malay:\n\n${userInput}\n\n`
        break;
    case promptList[2].name:
        instructionPrompt = `${userInput}`
        break;
    default:
    instructionPrompt = `The following is a conversation with an AI assistant. The assistant is helpful, creative, clever, and very friendly.
    \n\nHuman: Hello, who are you?
    \nAI: I am an AI created by OpenAI. How can I help you today?
    \nHuman: ${userInput}`
  }
  return instructionPrompt;
}
generateInstructionPrompt function.This code defines a function generateInstructionPrompt that generates an instruction prompt based on the current prompt selected by the user and the user input. The function takes two parameters: userInput and currentPrompt.
The function starts with an empty string instructionPrompt and then uses a switch statement to set the value of instructionPrompt based on the value of currentPrompt. The switch statement compares the value of currentPrompt with the names of the prompts in an array promptList.
- If the value of
currentPromptmatches the name of the first prompt inpromptList, theinstructionPromptis set to a string that contains the instructions for a conversation with an AI assistant. TheuserInputis included in the instructions. - If the value of
currentPromptmatches the name of the second prompt inpromptList, theinstructionPromptis set to a string that contains the instructions for translating a text into four languages: French, Spanish, Japanese, and Malay. TheuserInputis included in the instructions. - If the value of
currentPromptmatches the name of the third prompt inpromptList, theinstructionPromptis set to theuserInput. - If the value of
currentPromptdoesn't match any of the names inpromptList, theinstructionPromptis set to a string that contains the default instructions for a conversation with an AI assistant. TheuserInputis included in the instructions.
Finally, the function returns the instructionPrompt.
Create a function to generate the body
Different prompt needs different body when we send the request to the API. So we have to create a function to generate a specific body for each prompt.
Add the following code in index.js you can put them under the generateInstructionPrompt function:
function generateBody(currentPrompt, messages, userInput, tempMessages, instructionPrompt) {
  let body = "";
  switch(currentPrompt) {
    case promptList[0].name:
      body = JSON.stringify({input: `${messages.length === 0 ? instructionPrompt : tempMessages.map(m => m.message).join(" ")}`, prompt: currentPrompt})
      break;
    case promptList[1].name:
      body = JSON.stringify({input: instructionPrompt, prompt: currentPrompt})
    case promptList[2].name:
      body = JSON.stringify({input: instructionPrompt, prompt: currentPrompt})
      break;
    default:
      body = JSON.stringify({input: `${messages.length === 0 ? instructionPrompt : tempMessages.map(m => m.message).join(" ")}`, prompt: currentPrompt})
  }
  return body
}
generateBody function.The function generates a request body to be used in a fetch API call. The body is generated based on the value of currentPrompt which is used to determine the type of prompt for the API call.
It uses a switch statement to determine the type of prompt. If currentPrompt is equal to promptList[0].name, the body is set to a JSON string with the following properties:
input: This is either the value ofinstructionPromptifmessages.lengthis equal to 0, or a string concatenated from themessageproperties of objects in thetempMessagesarray.prompt: This is equal to the value ofcurrentPrompt.
If currentPrompt is equal to promptList[1].name or promptList[2].name, the body is set to a JSON string with the following properties:
input: This is equal to the value ofinstructionPrompt.prompt: This is equal to the value ofcurrentPrompt.
If currentPrompt does not match any of the cases, the body is set to a JSON string with the following properties:
input: This is either the value ofinstructionPromptifmessages.lengthis equal to 0, or a string concatenated from themessageproperties of objects in thetempMessagesarray.prompt: This is equal to the value ofcurrentPrompt.
Finally, the function returns the generated body.
Create the pages/api/generate endpoint
First., we need to install OpenAI official Node.js library to interact with the API through HTTP requests. Run this command in the terminal:
npm install openaiIf you don't know, any file inside the folder pages/api is mapped to /api/* and will be treated as an API endpoint instead of a page. They are server-side-only bundles and won't increase your client-side bundle size.
This is where we're going to make the request to OpenAI API. Let's create a new file pages/api/generate.js and populate it with the following contents:
import { Configuration, OpenAIApi } from "openai";
import { promptList} from "@/pages"
const configuration = new Configuration({
apiKey: process.env.OPENAI_API_KEY,
});
// using the secret key for authentication
const openai = new OpenAIApi(configuration);
// the function is called from index.js when it fetch(api/generate)
export default async function(req, res) {
if (!configuration.apiKey) {
res.status(500).json({
error: {
message: "OpenAI API key not configured, please follow instructions in README.md",
}
});
return;
}
// Get input and currentPrompt
const { input, prompt } = req.body;
const APIrequest = generateAPIrequest(prompt,input);
// If current prompt is Image generator
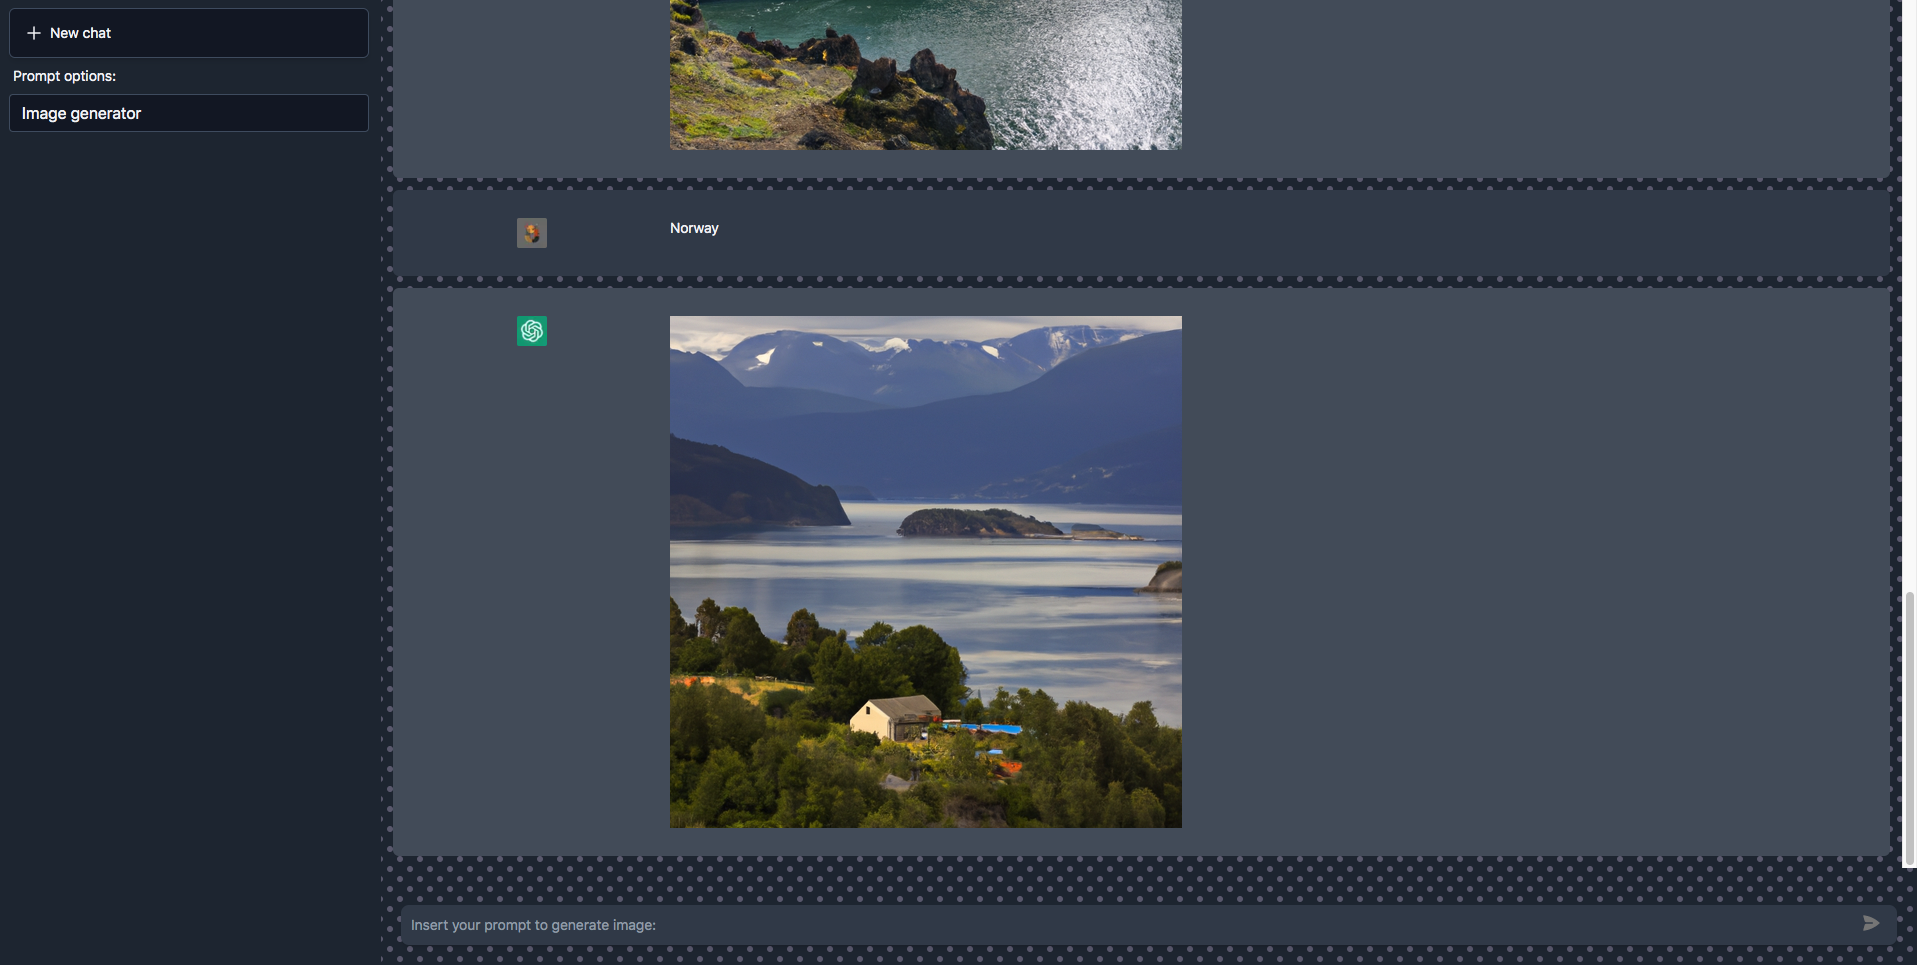
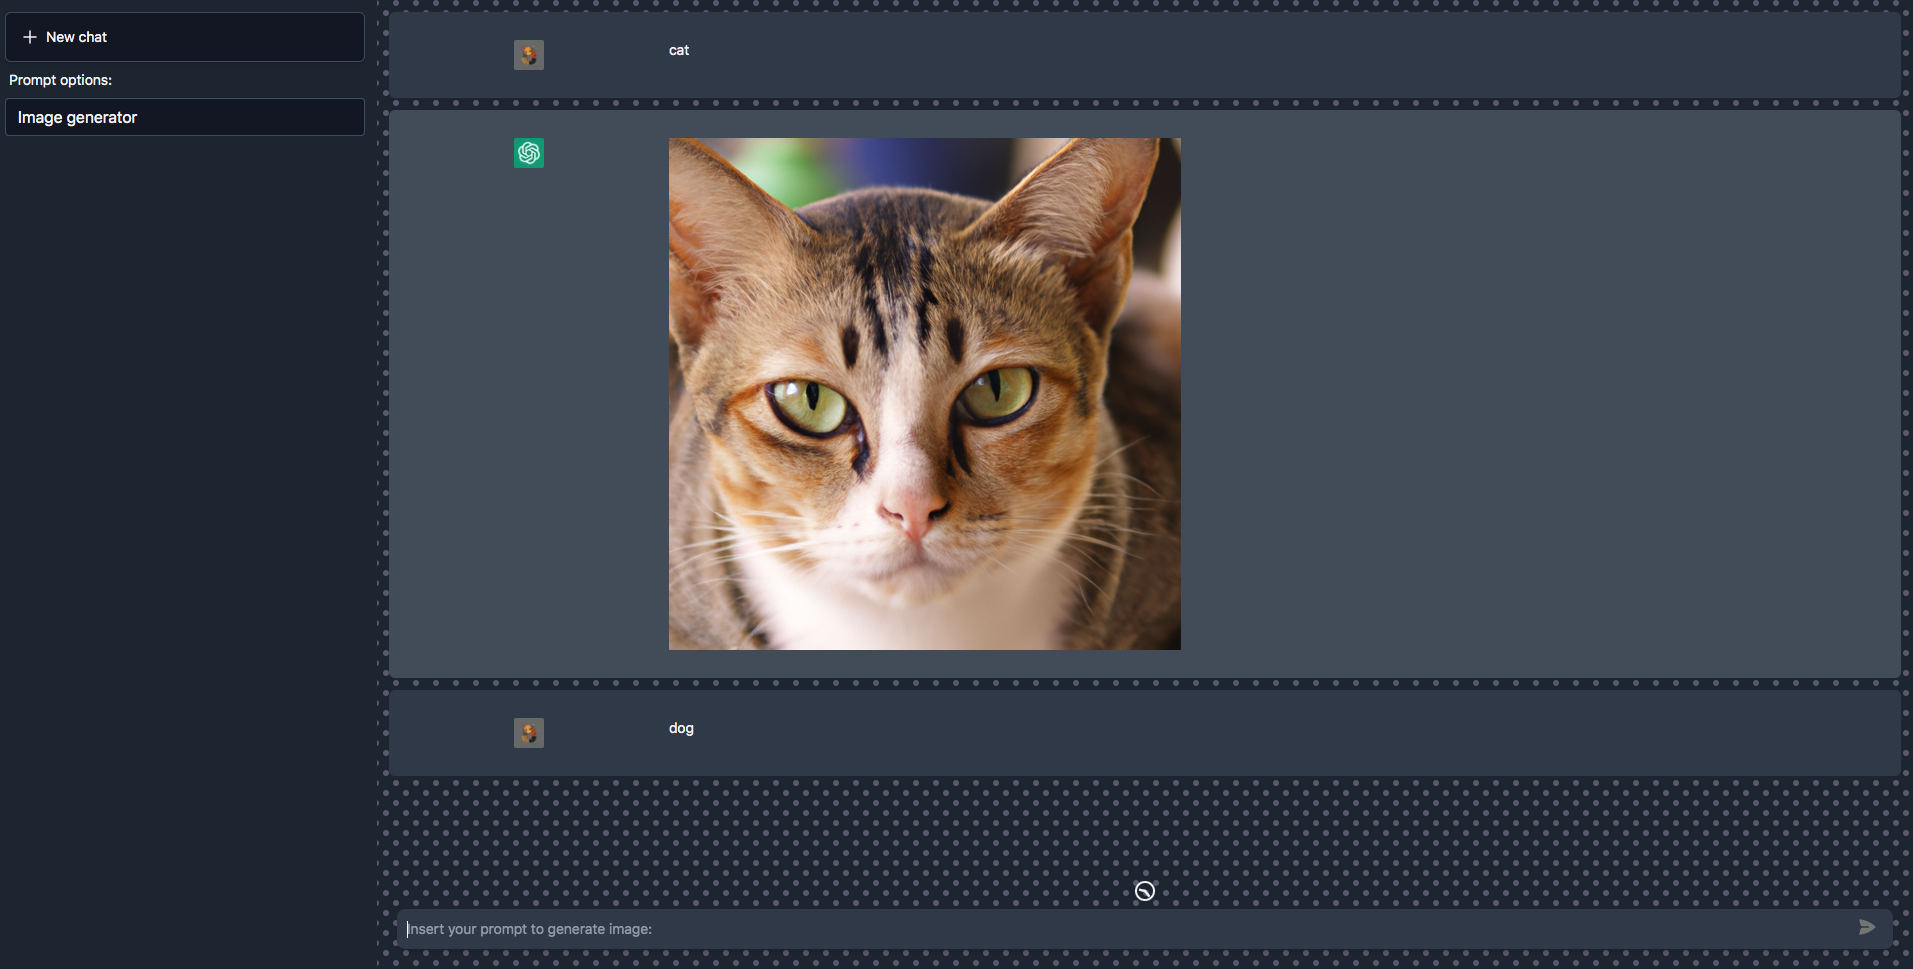
if(prompt === "Image generator") {
// Request OpenAI API
try {
const response = await openai.createImage(APIrequest);
res.status(200).json({image:response.data.data[0].url})
} catch(error) {
// Consider adjusting the error handling logic for your use case
if(error.response){
console.error(error.response.data, error.response.status);
res.status(error.response.status).json(error.response.data);
} else {
console.log(`Error with OpenAI API request: ${error.message}`);
res.status(500).json({
error: {
message: 'An error occurred during your request.',
}
});
}
}
return;
}
// Request OpenAI API if current prompt is not Image generator
try {
const response = await openai.createCompletion(APIrequest);
res.status(200).json({openAI:response.data.choices[0].text})
} catch(error) {
// Consider adjusting the error handling logic for your use case
if(error.response){
console.error(error.response.data, error.response.status);
res.status(error.response.status).json(error.response.data);
} else {
console.log(`Error with OpenAI API request: ${error.message}`);
res.status(500).json({
error: {
message: 'An error occurred during your request.',
}
});
}
}
}
// Selecting which request to send based on current prompt and injecting user input into the request
function generateAPIrequest(currentPrompt, input) {
let request = {};
for(let i = 0; i < promptList.length; i ++) {
if(currentPrompt === promptList[i].name)
{
promptList[i].request.prompt = input;
request = promptList[i].request;
}
}
return request;
}- The code starts by importing the necessary libraries:
ConfigurationandOpenAIApifrom theopenailibrary, andpromptListfrom the@/pagesfile. Theconfigurationobject is then instantiated with the API key, which is taken from the environment variables or.envwhich we created earlier. - The function then uses the
openaiobject to make an API request to the OpenAI API. The request type (image generation or completion generation) is determined by the value of thepromptfield in the request body. - If the
promptis "Image generator", the code makes a call toopenai.createImagewith the request details. If the request is successful, the URL of the generated image is returned in the response. If the request fails, the code logs the error message and returns an error status. - Otherwise, if the
promptis not an "Image generator", the code makes a call toopenai.createCompletionto generate a text completion. The response from the API is then returned in the HTTP response. - The code also includes error-handling logic to handle errors that may occur during the API request. If an error occurs, the code logs the error and returns an error status in the HTTP response.
- The
generateAPIrequestfunction is called to determine the API request to be made, based on thecurrentPromptand the user'sinput. The function loops through the elements of thepromptListarray and sets therequestobject to the correct request, based on the value ofcurrentPrompt. Therequestobject is then returned by the function.
Now everything is working! go and try to use the app.
Final touch
For this final touch, we're going to add auto-scrolling and loading animation to make this app a bit more lively.
Add auto-scrolling
To make everything quick, let's install react-scroll using the terminal:
npm install react-scrolland add the following code in pages/index.js :
import { useEffect } from "react";
import { animateScroll as scroll } from 'react-scroll';

//....code

export default function Home() {
//.....code
	useEffect(() => {
    scroll.scrollToBottom({
        containerId: "chat",
        duration: 250,
      });
    }, [messages])
//.....code
}- This code uses the
useEffecthook in React to perform a side effect whenever themessagesstate updates. - The effect is to scroll the chat container to the bottom when the
messagesstate updates. This is to ensure that the user is always viewing the latest message in the chat log. - The
scroll.scrollToBottomfunction is from thescroll-behaviorlibrary and it is used to scroll the chat container to the bottom. ThecontainerIdproperty is set to "chat", meaning that the chat container element should have an ID of "chat". Thedurationproperty is set to 250 milliseconds, meaning that the scrolling animation should last for 250 milliseconds. - The
useEffecthook takes two arguments: the first is a function that performs the side effect, and the second is an array of dependencies. In this case, the dependency is[messages], meaning that the effect will only run when themessagesstate changes.
Style the scrollbar
This is optional, just to make the scrollbar consistent with the design.
Open styles/globals.css and this following code:
@tailwind base;
@tailwind components;
@tailwind utilities;

@layer utilities {
    .scrollbar::-webkit-scrollbar {
      width: 10px;
      height: 10px;
    }

    .scrollbar::-webkit-scrollbar-track {
      background: #1F2937;
    }

    .scrollbar::-webkit-scrollbar-thumb {
      background: #374151;
      border-radius: 100vh;
    }

    .scrollbar::-webkit-scrollbar-thumb:hover {
      background: #4B5563;
    }
}
Add loading animation
The next and last thing is the loading animation. We're going to use React Spinners by David Hu. Go check his page for more loading animation. For this tutorial, we're going to use CloakLoader animation.
Use this command to install React Spinners:
npm install --save react-spinnersThen we declare loading useState Hook:
export default function Home() {
  // loading useState
  const [loading, setLoading] = useState(false);

  //.....code
}
We wanted the loading animation to be true when the request is happening. So we set it to true when submitting and then set it back to false when we get the response (success or error).
In pages/index.js find the following line and set the loading animation according to this code:
// Handle submit
async function submit(event) {
    event.preventDefault();
    // Set loading animation to true
    setLoading(true);

    //.....code

    try {
      //....code
      // Set loading animation to false
      setLoading(false);
    }
    catch (error) {
      // Set loading animation to false
      setLoading(false);
      //.....code
    }
}
The last step is to add the loading component. Find this {/* ClocLoader */} line and add the component.
import { ClockLoader } from 'react-spinners';

//....code

//....code

//....code

<div className="flex justify-center mb-2">
	{/* ClocLoader */}
	<ClockLoader size={20} color={"#F3F4F6"} loading={loading} />
</div>
You can try it now, to make sure it's working.
There you go! We've finally finished the app. If you're still here, thank you for taking the time to read this tutorial. I hope you have gained a deeper understanding of the code and its functionality. If you have any questions or concerns, feel free to reach out to me. I am always happy to help. I hope this tutorial has been a valuable resource for you and that you can put your newfound knowledge to good use. Cheers!
Full code
Something Wrong?
If it’s still not working. This is the whole code for your reference. (Next js file structure)
pages/index.js
import Chat from "@/components/chat";
import Prompts from "@/components/prompts";
import Head from "next/head";
import custombg from "/styles/bg.module.css";
import { useState } from "react";
import { useEffect } from "react";
import { animateScroll as scroll } from 'react-scroll';
import { ClockLoader } from 'react-spinners';

const promptList = [
  {
      name: "AI assistant",
      request : {
        model: "text-davinci-003",
        prompt: "",
        temperature: 0.9,
        max_tokens: 150,
        top_p: 1,
        frequency_penalty: 0,
        presence_penalty: 0.6,
        stop: [" Human:", " AI:"],
      }
  },
  {
      name: "English to other languages",
      request: {
        model: "text-davinci-003",
        prompt: "",
        temperature: 0.1,
        max_tokens: 200,
        top_p: 1.0,
        frequency_penalty: 0.0,
        presence_penalty: 0.0,
      }
  },
  {
      name: "Image generator",
      request: {
        prompt: "",
        n: 1,
        size: "512x512",
      }
  }
]
export {promptList};

// Generate instruction prompt
function generateInstructionPrompt(userInput, currentPrompt) {
  let instructionPrompt = ``;
  switch (currentPrompt) {
    case promptList[0].name:
         instructionPrompt = `The following is a conversation with an AI assistant. The assistant is helpful, creative, clever, and very friendly.
         \nHuman: Hello, who are you?
         \nAI: I am an AI created by OpenAI. How can I help you today?
         \nHuman: ${userInput}
         \nAI:`
         break;
    case promptList[1].name:
        instructionPrompt = `Translate this into four languages 1. French, 2. Spanish, 3. Japanese and 4. Malay:\n\n${userInput}\n\n`
        break;
    case promptList[2].name:
        instructionPrompt = `${userInput}`
        break;
    default:
    instructionPrompt = `The following is a conversation with an AI assistant. The assistant is helpful, creative, clever, and very friendly.
    \n\nHuman: Hello, who are you?
    \nAI: I am an AI created by OpenAI. How can I help you today?
    \nHuman: ${userInput}`
  }
  return instructionPrompt;
}

// Generate body
function generateBody(currentPrompt, messages, userInput, tempMessages, instructionPrompt) {
  let body = "";
  switch(currentPrompt) {
    case promptList[0].name:
      body = JSON.stringify({input: `${messages.length === 0 ? instructionPrompt : tempMessages.map(m => m.message).join(" ")}`, prompt: currentPrompt})
      break;
    case promptList[1].name:
      body = JSON.stringify({input: instructionPrompt, prompt: currentPrompt})
    case promptList[2].name:
      body = JSON.stringify({input: instructionPrompt, prompt: currentPrompt})
      break;
    default:
      body = JSON.stringify({input: `${messages.length === 0 ? instructionPrompt : tempMessages.map(m => m.message).join(" ")}`, prompt: currentPrompt})
  }
  return body
}

// To generate placeholder
function generatePlaceholder(currentPrompt) {
  switch(currentPrompt) {
    case promptList[0].name:
      return "Start chatting"
    case promptList[1].name:
      return "Insert any text you want to translate into French,Spanish,Japanese and Malay: "
    case promptList[2].name:
      return "Insert your prompt to generate image:"
    default:
      return "Start chatting."
  }
}

export default function Home() {
  // loading useState
  const [loading, setLoading] = useState(false);
  // Save and set conversation
  const [messages, setMessages] = useState([]);
  // Save and set current prompt
  const [currentPrompt, setCurrentPrompt] = useState(`AI assistant`);
  // Save and set userinput
  const [userInput,setUserInput] = useState("");
  // Message type
  const messageType = {me: "me", openAI: "openAI"};

  // Scroll the chat container to the bottom
  useEffect(() => {
    scroll.scrollToBottom({
        containerId: "chat",
        duration: 250,
      });
  }, [messages])

  // Set a new chat
  function clearChat() {
    setMessages([]);
  }

  // Set prompt
  function setPrompt(event) {
    event.preventDefault();
    clearChat();
    setCurrentPrompt(event.target.value);
  }

  // Handle submit
  async function submit(event) {
    event.preventDefault();
    // Set loading animation to true
    setLoading(true);
    // Get instruction prompt
    const instructionPrompt = generateInstructionPrompt(userInput, currentPrompt)
    // Temporary message
    let tempMessages = [...messages, {user: `${messageType.me}`, message: `${userInput}`}];
    // Put the userInput in the messages
    setMessages(tempMessages);
    // Clear user input
    setUserInput("");

    // Call the API
    try {
      const response = await fetch("api/generate",{
        method: "POST",
        headers: {
          "Content-Type": "application/json",
        },
        body: generateBody(currentPrompt, messages, userInput, tempMessages, instructionPrompt)
      });

      // If we get unsuccessful response
      const data = await response.json();
      if (response.status !== 200) {
        throw data.error || new Error(`Request failed with status ${response.status}`);
      }
      setMessages([...tempMessages, {user: messageType.openAI, message: `${data.openAI && data.openAI.trimStart()}`, image: data.image }]);
      // Set loading animation to false
      setLoading(false);
    }
    catch (error) {
      // Set loading animation to false
      setLoading(false);
      // Consider implementing your own error handling logic here
      console.error(error);
      alert(error.message);
    }
  }

  return (
    <>
      {/* Head */}
      <Head>
          <title>ChatGPT</title>
          <link rel="icon" href="/openai.png"/>
      </Head>
      {/* Main */}
      <div className={`w-full min-h-full ${custombg.customBg}`}>
        <div className="flex">
          {/* Sidebar */}
          <div className="bg-gray-800 h-screen w-1/5 p-2">
            <div>
              {/* New chat */}
              <div>
                <div className="text-gray-100 flex items-center text-xl p-3  bg-gray-900 rounded-md border border-slate-600 shadow-md m-1 hover:bg-gray-700" onClick={clearChat}>
                    <svg xmlns="http://www.w3.org/2000/svg" fill="none" viewBox="0 0 24 24" strokeWidth={1.5} stroke="currentColor" className="w-6 h-6">
                      <path strokeLinecap="round" strokeLinejoin="round" d="M12 6v12m6-6H6" />
                    </svg>
                    <h2 className="text-sm px-1">
                        New chat
                    </h2>
                </div>
              </div>
              {/* Prompts */}
              <div>
                  <h2 className="text-sm px-2 py-1 text-gray-100">
                        Prompt options:
                  </h2>
                  <div className="p-1 flex justify-center">
                    <select onChange={setPrompt} className="form-select appearance-none
                    block
                    w-full
                    px-3
                    py-1.5
                    text-gray-100
                    bg-gray-900 bg-clip-padding bg-no-repeat
                    border border-slate-600
                    rounded
                    transition
                    ease-in-out
                    m-0
                    focus:text-gray-100 focus:bg-gray-900 focus:border-slate-600 focus:outline-none">
                    {/* Prompts select button  */}
                    <Prompts/>
                    </select>
                  </div>
              </div>
            </div>
          </div>
          {/* Main area */}
          <div className="w-4/5 relative">
            {/* Chat area */}
            <div id="chat" className="h-[90vh] overflow-auto scrollbar">
              {messages.length > 0 &&
                messages.map((user, index)=>(
                  <Chat key={index} user={user}/>
                ))
              }
            </div>
            {/* Text input area */}
            <div>
              <div className="p-5 absolute bottom-0 right-0 left-0">
                <div className="flex justify-center mb-2">
                  {/* ClocLoader */}
                  <ClockLoader size={20} color={"#F3F4F6"} loading={loading} />
                </div>
                <form className="relative" onSubmit={submit}>
                  <input
                    type="text"
                    placeholder= {generatePlaceholder(currentPrompt)}
                    value={userInput}
                    required
                    onChange={(e)=>setUserInput(e.target.value)}
                    rows="1"
                    className="block p-2.5 w-full text-sm text-gray-50 bg-gray-700 rounded-lg focus:outline-none ring-gray-500 focus:border-gray-500 shadow-md"
                  />
                  <button type="submit" className="right-2 bottom-3 absolute pr-2" >
                    <svg xmlns="http://www.w3.org/2000/svg" viewBox="0 0 20 20" fill="gray" className="w-5 h-5">
                      <path d="M3.105 2.289a.75.75 0 00-.826.95l1.414 4.925A1.5 1.5 0 005.135 9.25h6.115a.75.75 0 010 1.5H5.135a1.5 1.5 0 00-1.442 1.086l-1.414 4.926a.75.75 0 00.826.95 28.896 28.896 0 0015.293-7.154.75.75 0 000-1.115A28.897 28.897 0 003.105 2.289z" />
                    </svg>
                  </button>
                </form>
              </div>
            </div>
          </div>
        </div>
      </div>

    </>
  )
}API
api/generate.js
import { Configuration, OpenAIApi } from "openai";
import { promptList} from "@/pages"
const configuration = new Configuration({
    apiKey: process.env.OPENAI_API_KEY,
});

// using the secret key for authentication
const openai = new OpenAIApi(configuration);

// the function is called from index.js when it fetch(api/generate)
export default async function(req, res) {
    if (!configuration.apiKey) {
        res.status(500).json({
          error: {
            message: "OpenAI API key not configured, please follow instructions in README.md",
          }
        });
        return;
    }

    // Get input and currentPrompt
    const { input, prompt }  = req.body;

    const APIrequest = generateAPIrequest(prompt,input);

    // If current prompt is Image generator
    if(prompt === "Image generator") {
        // Request OpenAI API
        try {

            const response = await openai.createImage(APIrequest);
            res.status(200).json({image:response.data.data[0].url})
        } catch(error) {
            // Consider adjusting the error handling logic for your use case
            if(error.response){
                console.error(error.response.data, error.response.status);
                res.status(error.response.status).json(error.response.data);
            } else {
                console.log(`Error with OpenAI API request: ${error.message}`);
                res.status(500).json({
                    error: {
                        message: 'An error occurred during your request.',
                    }
                });
            }
        }

        return;
    }

    // Request OpenAI API if current prompt is not Image generator
    try {
        const response = await openai.createCompletion(APIrequest);
        res.status(200).json({openAI:response.data.choices[0].text})
    } catch(error) {
        // Consider adjusting the error handling logic for your use case
        if(error.response){
            console.error(error.response.data, error.response.status);
            res.status(error.response.status).json(error.response.data);
        } else {
            console.log(`Error with OpenAI API request: ${error.message}`);
            res.status(500).json({
                error: {
                    message: 'An error occurred during your request.',
                }
            });
        }
    }
}

// Selecting which request to send based on current prompt and injecting user input into the request
function generateAPIrequest(currentPrompt, input) {
    let request = {};
    for(let i = 0; i < promptList.length; i ++) {
        if(currentPrompt === promptList[i].name)
        {
            promptList[i].request.prompt = input;
            request = promptList[i].request;
        }
    }
    return request;
}Components
components/chat.js
import Image from "next/image";
import profilePic from "/public/user.png";
import openAIPic from "/public/openai.png";


export default function Chat({user}) {

    return (
            <div id="chat" className={`flex justify-center m-3 pr-28 py-7 rounded-md ${user.user === "me" ? "bg-gray-700" : "bg-gray-600"} `}>
                <div className="w-1/5">
                    <Image
                        src= {user.user === "me" ? profilePic : openAIPic}
                        className="ml-auto mr-auto rounded-sm"
                        alt="picture of you"
                        width={30}
                        height={30}
                    />
                </div>
                <div className="w-4/5 text-gray-100 text-sm" style={{whiteSpace: 'pre-wrap'}}>
                   {user.image ? <img src={user.image}/> : user.message}
                </div>
            </div>
    )
}
components/chat.jscomponents/prompt.js
import { promptList} from "@/pages"
export default function Prompts() {
    return (
            <>
                {promptList.map((prompt) => (
                    <option key={prompt.name} value={prompt.name}>{prompt.name}</option>
                ))}
            </>
    )
}components/prompt.jsStyles
styles/bg.module.css
.customBg{
    background-color: #1f2937;
    background-image: url("data:image/svg+xml,%3Csvg width='20' height='20' viewBox='0 0 20 20' xmlns='http://www.w3.org/2000/svg'%3E%3Cg fill='%239C92AC' fill-opacity='0.52' fill-rule='evenodd'%3E%3Ccircle cx='3' cy='3' r='3'/%3E%3Ccircle cx='13' cy='13' r='3'/%3E%3C/g%3E%3C/svg%3E");
  }
styles/bg.module.cssstyles/globals.css
@tailwind base;
@tailwind components;
@tailwind utilities;

@layer utilities {
    .scrollbar::-webkit-scrollbar {
      width: 10px;
      height: 10px;
    }

    .scrollbar::-webkit-scrollbar-track {
      background: #1F2937;
    }

    .scrollbar::-webkit-scrollbar-thumb {
      background: #374151;
      border-radius: 100vh;
    }

    .scrollbar::-webkit-scrollbar-thumb:hover {
      background: #4B5563;
    }
}styles/globals.cssEnvironment
.env
OPENAI_API_KEY=Your OpenAI secret keyFAQs:
How do I get started with OpenAI API?
Getting started with OpenAI API is simple and straightforward. Here are the steps you can follow to get up and running:
- Sign up for an OpenAI account: You can sign up for an OpenAI account on their website. You'll need to provide some basic information, including your name and email address.
- Obtain an API key: Once you've signed up, you'll be able to obtain an API key. This key will be used to access the OpenAI API and is required to make API calls.
- Choose a use case: Before you start using OpenAI API, you'll need to choose a use case. This could be anything from building a chatbot to developing a language translation model.
- Test the API: Once you have your API key, you can test the API by making a sample API call. OpenAI provides detailed documentation and tutorials to help you get started.
- Start building: Now that you have your API key and a clear use case in mind, you can start building your AI model using OpenAI API. You can use the API to develop and train your model, and then deploy it for use in your applications.
By following these steps, you can quickly and easily get started with OpenAI API and start building your own AI models and applications!
What are the key components of OpenAI API?
OpenAI API has several key components that make it a powerful and flexible platform for building AI models and applications. These include:
- Pre-trained models: OpenAI API provides access to a range of pre-trained models that have been developed using the latest AI techniques. These models can be used as a starting point for your own models, or you can fine-tune them to meet your specific needs.
- Model training and deployment: OpenAI API provides tools for training and deploying AI models, making it easy to build and deploy AI models in a variety of settings.
- API documentation and tutorials: OpenAI provides extensive documentation and tutorials to help you get started with the API, and to guide you as you build and deploy your AI models.
- Scalability: OpenAI API is designed to scale to meet the demands of your applications. You can train your models on large datasets and then deploy them at scale, making it a great choice for large-scale AI projects.
- Access to cutting-edge AI technology: OpenAI is a leader in AI research and development, and OpenAI API provides access to the latest AI technologies and techniques. This means you'll be able to build cutting-edge AI models that can deliver high performance and accuracy.
These are the key components of OpenAI API, and they make it a powerful and accessible platform for building AI models and applications.